


RaspberryPI WebRTC-Kamera für Alexa, Google Home
In diesem Abschnitt zeigen wir dir, wie du eine Sinric Pro Kamera anlegst und den Kamera-Feed ansiehst auf
- Alexa Echo Show
- Alexa App
- Google Nest Smart Display und Chromecast-mit-Google-TV-Geräten.
- Sinric Pro App und Portal.
Voraussetzungen :
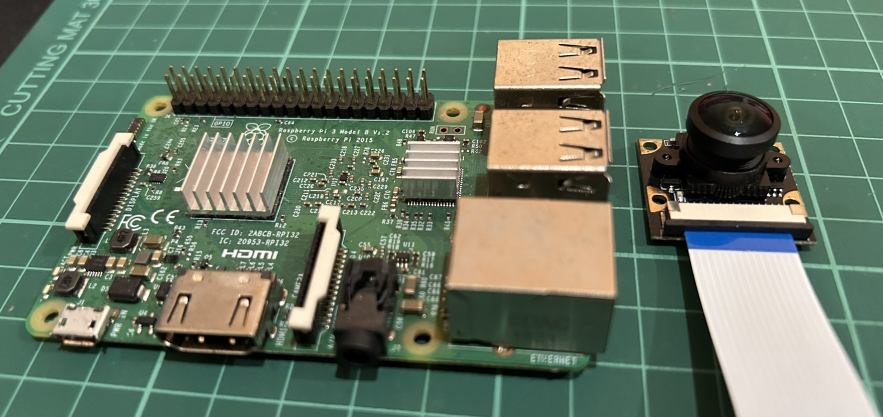
- Raspberry Pi x 1 (bullseye oder neuer).
- Kamera-Controller x 1.
Was ist WebRTC?
WebRTC (Web Real-Time Communication) ist eine Technologie, die Echtzeit-Audio- und Videokommunikation über das Internet ermöglicht, ohne dass Plugins oder Downloads nötig sind. Sie wird von allen gängigen Browsern, Apps und Smart-Home-Geräten wie Amazon Echo Show, Chromecast und Google Nest unterstützt und ist damit ein leistungsfähiges Werkzeug für Echtzeit-Kommunikationsanwendungen. WebRTC überträgt Audio- und Videodaten per Peer-to-Peer-Verbindung. Das bedeutet, dass Video und Audio direkt zwischen den beiden beteiligten Geräten übertragen werden, ohne über den Sinric Pro Server zu laufen. Das verringert die Latenz und verbessert die Performance, besonders bei Anwendungen über große Entfernungen.
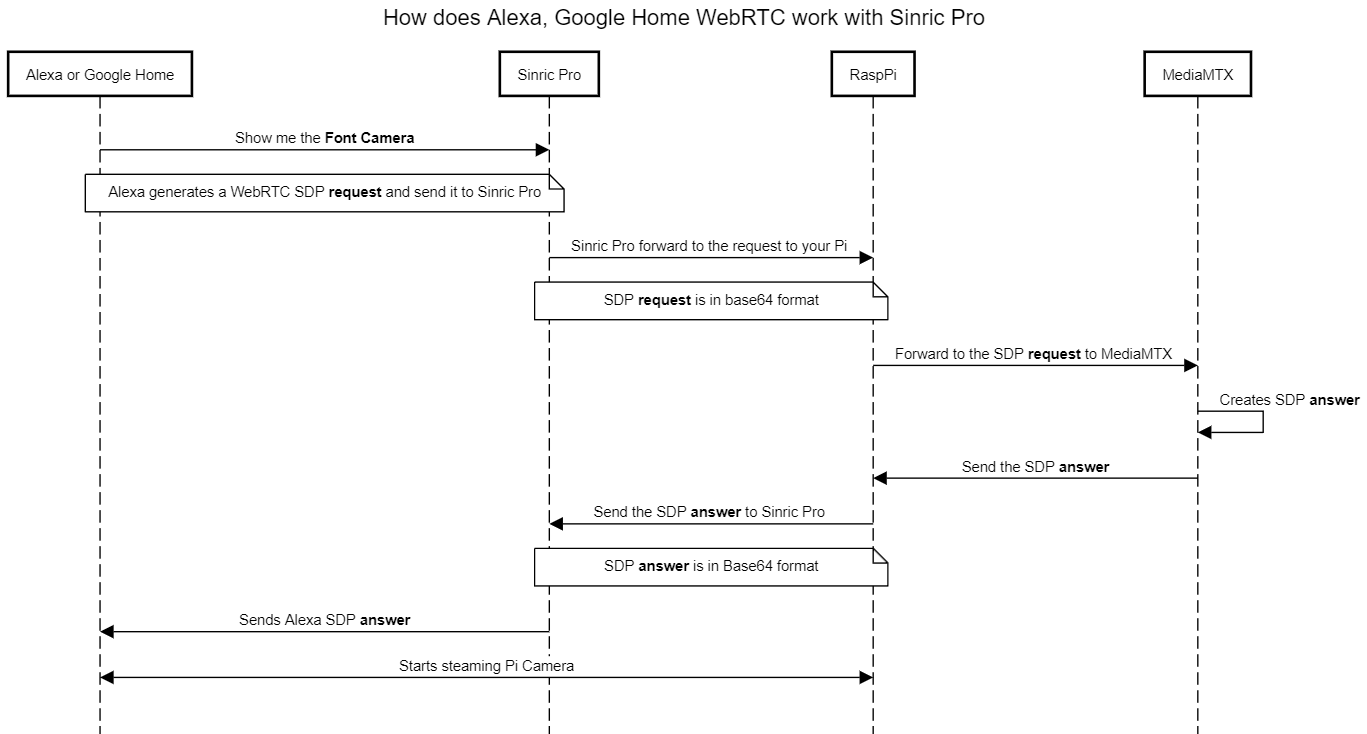
Wie funktioniert Alexa/Google Home WebRTC mit Sinric Pro?
Schritt 1: Raspberry Pi mit dem Kameramodul einrichten
Eine Anleitung zum Einrichten des Raspberry Pi mit dem Kameramodul findest du in diesem sehr guten Artikel der Raspberry Pi Foundation hier
Schritt 2: MediaMTX (früher rtsp-simple-server) einrichten, um die Pi-Kamera zu streamen.
MediaMTX ist ein Echtzeit-Medienserver, mit dem du Video und Audio über das Netzwerk streamen kannst. Er unterstützt viele Streaming-Protokolle, darunter RTSP, HLS, SRT, WebRTC und RTMP. Da er die Raspberry Pi Kamera nativ unterstützt, können wir das Pi-Kamerabild ganz einfach per WebRTC mit MediaMTX streamen.
Richten wir MediaMTX ein.
Für arm64 Raspberry Pi:
pi@pi3:~/Desktop/tutorial $ wget https://github.com/bluenviron/mediamtx/releases/download/v0.23.3/mediamtx_v0.23.3_linux_amd64.tar.gz
pi@pi3:~/Desktop/tutorial $ tar -xzvf mediamtx_v0.23.3_linux_amd64.tar.gz
pi@pi3:~/Desktop/tutorial $ rm mediamtx_v0.23.3_linux_amd64.tar.gz
Für arm64v8 Raspberry Pi:
pi@pi3:~/Desktop/tutorial $ wget https://github.com/bluenviron/mediamtx/releases/download/v0.23.3/mediamtx_v0.23.3_linux_arm64v8.tar.gz
pi@pi3:~/Desktop/tutorial $ tar -xzvf mediamtx_v0.23.3_linux_arm64v8.tar.gz
pi@pi3:~/Desktop/tutorial $ rm mediamtx_v0.23.3_linux_arm64v8.tar.gz
Nach dem Entpacken siehst du 3 Dateien: mediamtx mediamtx.yml license
pi@pi3:~/Desktop/tutorial $ ls -l
total 36544
-rw-r--r-- 1 pi pi     1062 May 24 16:07 LICENSE
-rwxr-xr-x 1 pi pi 24859649 May 24 16:15 mediamtx
-rw-r--r-- 1 pi pi    19171 Sep 22 12:34 mediamtx.yml
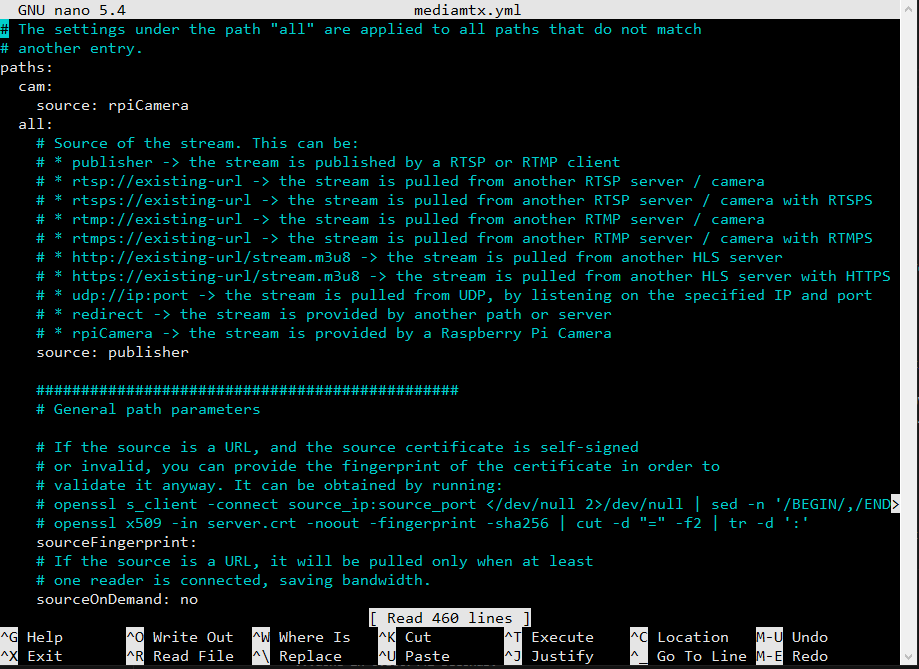
Bearbeite mediamtx.yml, um die Raspberry-Pi-Kamera zu aktivieren:
paths:
  cam:
    source: rpiCamera
Speichere mediamtx.yml und schließe die Datei.
Starte MediaMTX mit: ./mediamtx mediamtx.yml
pi@pi3:~/Desktop/tutorial $ ./mediamtx mediamtx.yml

2023/09/22 12:34:58 INF MediaMTX / rtsp-simple-server v0.23.3
2023/09/22 12:34:58 INF [path cam] [rpicamera source] started
2023/09/22 12:34:58 INF [RTSP] listener opened on :8554 (TCP), :8000 (UDP/RTP), :8001 (UDP/RTCP)
2023/09/22 12:34:58 INF [RTMP] listener opened on :1935
2023/09/22 12:34:58 INF [HLS] listener opened on :8888
2023/09/22 12:34:58 INF [WebRTC] listener opened on :8889 (HTTP)
[0:26:13.822982709] [1457]  INFO Camera camera_manager.cpp:299 libcamera v0.0.4+22-923f5d70
[0:26:13.887593667] [1458]  INFO RPI raspberrypi.cpp:1476 Registered camera /base/soc/i2c0mux/i2c@1/ov5647@36 to Unicam device /dev/media2 and ISP device /dev/media0
[0:26:13.889176990] [1457]  INFO Camera camera.cpp:1028 configuring streams: (0) 1920x1080-YUV420
[0:26:13.889745371] [1458]  INFO RPI raspberrypi.cpp:851 Sensor: /base/soc/i2c0mux/i2c@1/ov5647@36 - Selected sensor format: 1920x1080-SGBRG10_1X10 - Selected unicam format: 1920x1080-pGAA
2023/09/22 12:34:59 INF [path cam] [rpicamera source] ready: 1 track (H264)
Der resultierende Raspberry-Pi-Kamera-Stream ist unter dem Pfad http://hostname:8889/cam/ erreichbar. Prüfe, ob du auf die Kamera zugreifen kannst, z. B.:
http://pi3:8889/cam/
Schritt 3: Sinric Pro Integration.
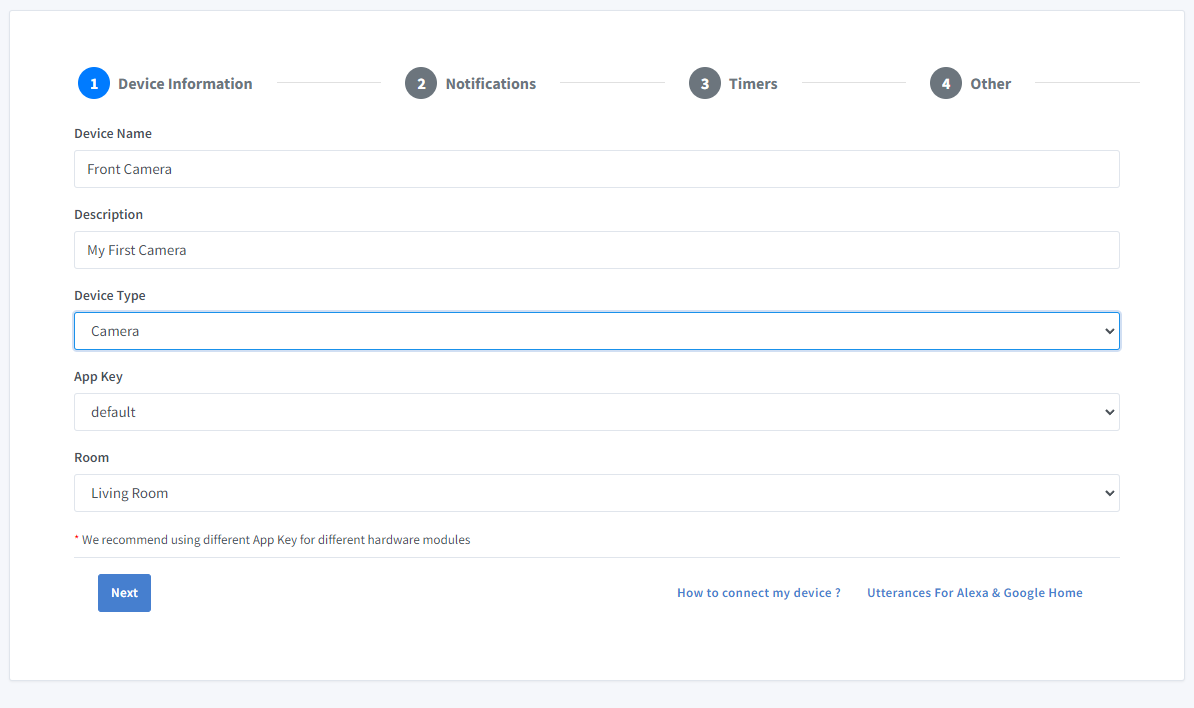
- Melde dich an bei deinem Sinric Pro Konto, gehe links im Menü zu Devices und klicke oben links auf Add Device.
- Gib den Gerätenamen Front Camera, die Beschreibung My First Camera ein und wähle als Gerätetyp Camera.
- Klicke auf den Tab Other
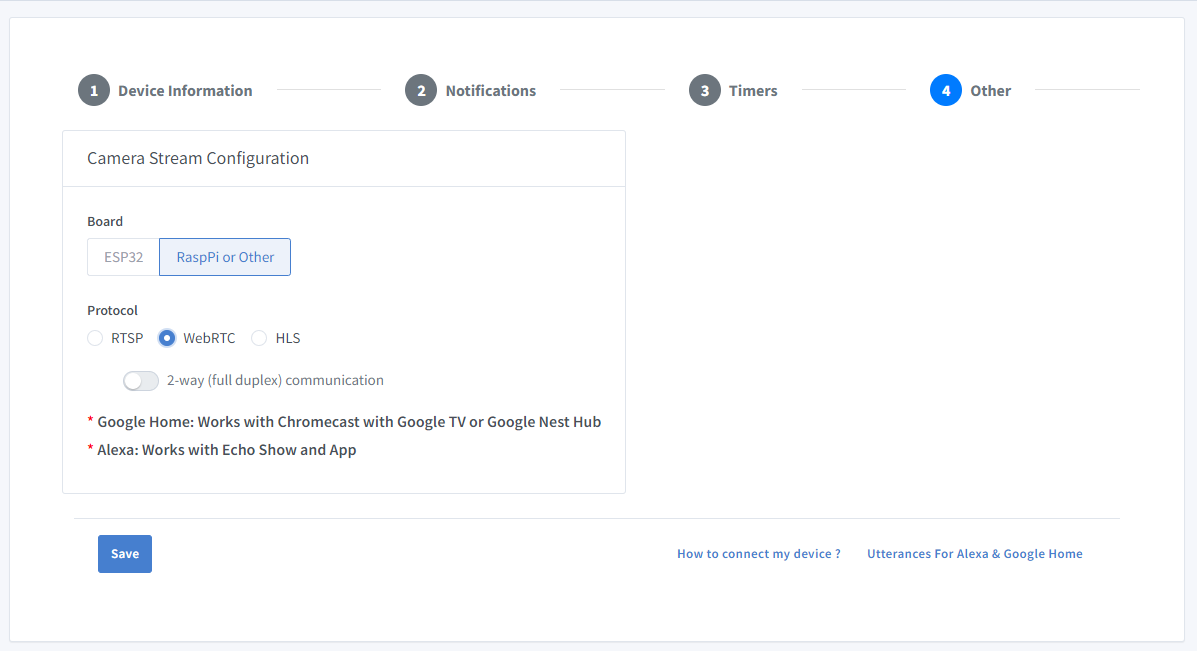
Wähle RaspPi or Other und als Protokoll WebRTC
-
Klicke auf Others und dann auf Save
-
Der nächste Bildschirm zeigt die Zugangsdaten, die du brauchst, um das gerade erstellte Gerät zu verbinden.
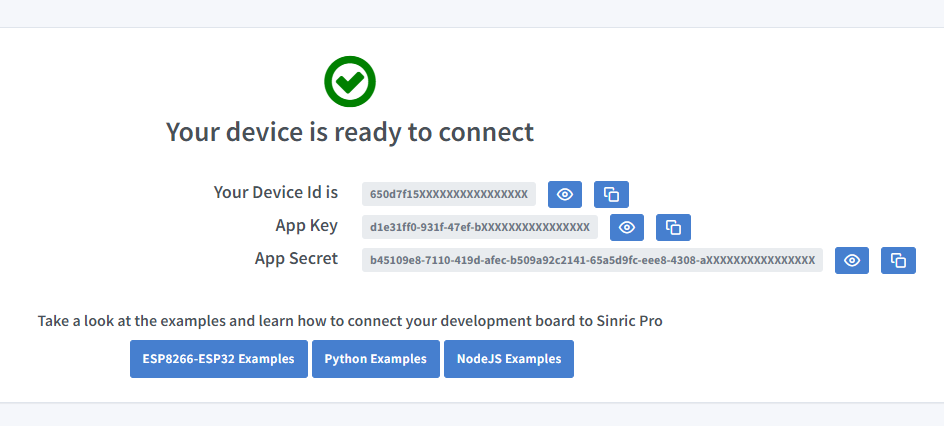
- Kopiere Device Id, App Key und App Secret Halte diese Werte geheim. TEILE SIE NICHT IN ÖFFENTLICHEN FOREN!
Schritt 4: Programmierung
Du kannst das Python- oder NodeJS-SDK verwenden, um die SDP-Offer/Answer-Anfragen zwischen Alexa/Google Home und MediaMTX zu verarbeiten.
Installiere unser PythonSDK:
pip install sinricpro --user
from sinric import SinricPro, SinricProConstants
import requests
import asyncio
import base64

APP_KEY = ""
APP_SECRET = ""
CAMERA_ID = ''

def get_webrtc_answer(device_id, offer):
    sdp_offer = base64.b64decode(offer)
    print('device_id: {} offer: {}'.format(device_id, offer))

    # PORT 8889 for WebRTC. eg: for PiCam, use http://<mediamtx-hostname>:8889/cam/whep
    mediamtx_url = "http://<mediamtx-hostname>:8889/cam/whep"  #TODO: Change <mediamtx-hostname>
    headers = {"Content-Type": "application/sdp"}
    response = requests.post(mediamtx_url, headers=headers, data=sdp_offer)

    if response.status_code == 201:
        answer = base64.b64encode(response.content).decode("utf-8")
        return True, answer
    else:
        return False


def power_state(device_id, state):
    print('device_id: {} power state: {}'.format(device_id, state))
    return True, state

callbacks = {
    SinricProConstants.GET_WEBRTC_ANSWER: get_webrtc_answer,
    SinricProConstants.SET_POWER_STATE: power_state
}

if __name__ == '__main__':
    loop = asyncio.get_event_loop()
    client = SinricPro(APP_KEY, [CAMERA_ID], callbacks,
                       enable_log=False, restore_states=False, secret_key=APP_SECRET)
    loop.run_until_complete(client.connect())
Diesen Code auf GitHub Gist ansehen
Installiere unser NodeJS SDK:
npm install sinricpro
const {
  SinricPro, startSinricPro, raiseEvent, eventNames,
} = require('sinricpro');

const fetch = require('node-fetch');

const APPKEY =  "";
const APPSECRET = "";
const cameraId = "";
const deviceIds = [cameraId];

async function mediamtx(offer) {
  /*
    Get the answer from mediamtx `http://<hostname>:8889/<name>/whep`. eg: http://pi3:8889/cam/whep
  */
  const url = "http://<mediamtx-hostname>:8889/cam/whep";  // TODO: Change <mediamtx-hostname>.
  const response = await fetch(url, {
    headers: {
      "content-type": "application/sdp",
    },
    body: offer,
    method: "POST",
  });

  // eslint-disable-next-line no-return-await
  return await response.text();
}

const getWebRTCAnswer = async (deviceid, base64Offer) => {
  // Alexa Eco needs camera stream answer
  const offer = Buffer.from(base64Offer, 'base64').toString();
  try {
    const answer = await mediamtx(offer);
    const answerInBase64 = Buffer.from(answer).toString('base64');
    return { success: true, answer: answerInBase64 };
  } catch (error) {
    console.error(error);
    return { success: false };
  }
};

const setPowerState = async (deviceid, data) => {
  console.log(deviceid, data);
  return true;
};

const sinricpro = new SinricPro(APPKEY, deviceIds, APPSECRET, false);
const callbacks = { setPowerState, getWebRTCAnswer };

startSinricPro(sinricpro, callbacks);
Diesen Code auf GitHub Gist ansehen
Schritt 5: Demo
- Bitte Alexa oder Google Home, neue Geräte zu suchen.
- Alexa: „Alexa, zeig mir die Font Camera“
- Google Home: „Zeig mir die Font Camera“ auf dem Working Room TV (Name deines Chromecast mit Google TV)
Alexa Show Echo:
Portal:
Google Home Chromecast mit Google TV:

Alexa App:
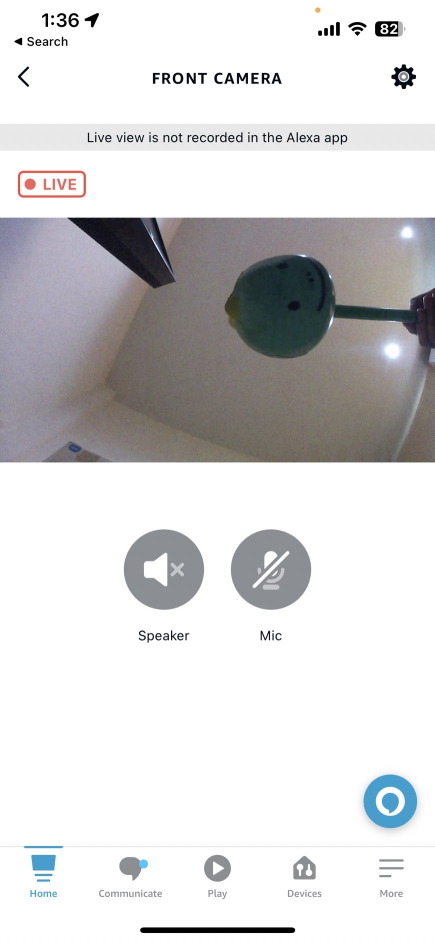
Sinric Pro App:
Fehlerbehebung
-
Die öffentliche Beta-Kameravorschau der Google Home App funktioniert nicht richtig.
-
Google Home WebRTC wird derzeit nur auf dem Google Nest Smart Display und auf Chromecast-mit-Google-TV-Geräten unterstützt.
-
Du kannst das Google WebRTC Tool verwenden, um die Payload zu prüfen. https://smarthome-webrtc-validator.withgoogle.com/
-
Kamera funktioniert nicht?
Stelle sicher, dass sie richtig verdrahtet ist.
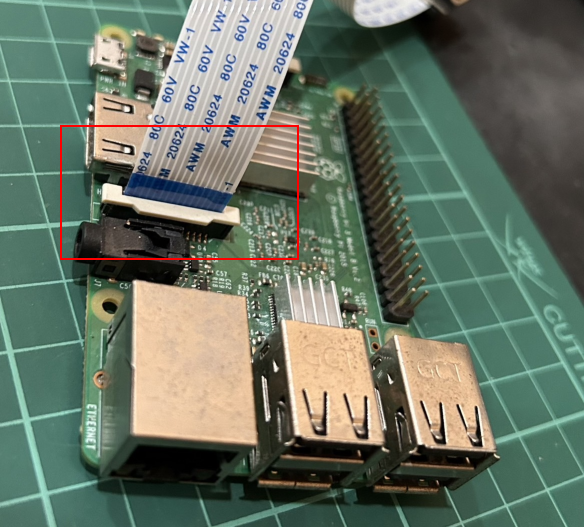
Mögliche Lösungen für dein Problem findest du auf unserer Seite Troubleshooting.
Verwandte Tutorials
- ESP32 oder ESP8266 mit Alexa und Google Home steuern
- ESP32-S3 H.264 Kamera für Alexa und Google Home
- ESP32 WebRTC Kamera
- Smarte Türklingel
This document is open source. See a typo? Please create an issue