


DHT11 and DHT22 Temperature and Humidity Sensor with ESP32 or ESP8266 for Alexa and Google Home
In this section we’ll walk through creating a Temperature Sensor using ESP32, ESP8266 and then view the temperature via Alexa, Google Home or SmartThings.
Prerequisites :
- ESP32, ESP8266 x 1.
- DHT11 or DHT22, AM2302, RHT03 x 1.
- Jumper Wires.
Quick introduction to Temperature Sensor
The DHT and AM series are low-cost digital sensor for sensing temperature and humidity. It uses a capacitive humidity sensor and a thermistor to measure the surrounding air and then spits out a digital signal on the data pin.
Wiring

Note: Some DHT22 sensors do not come with a pull-up resistor, so you may need to connect one yourself. A 10k resistor is typically used, and it should be connected from the data pin of the sensor to the +3.3V or +5V power supply.
| MCU | DHT Pin |
|---|---|
| ESP32 | 16 |
| ESP8266 | 14 (D5) |
Setup arduino-DHT library
We will be using arduino-DHT library to read the temperature and humidity from our sensor. Goto arduino-DHT and download the library as a zip file.

Then extract the zip file to C:\Users\<username>\Documents\Arduino\libraries\arduino-DHT. This is how it should look like.

Let’s verify that temperature is wired correctly and working.
#include "DHT.h" // https://github.com/markruys/arduino-DHT  Support for DHT11 and DHT22, AM2302, RHT03

#if defined(ESP8266)
  #define DHT_PIN    D1
#elif defined(ESP32)
  #define DHT_PIN    16
#endif

float temperature;
float humidity;

DHT dht;

void setup() {
  Serial.begin(115200);
  delay(10);

  dht.setup(DHT_PIN);
}

void loop() {
    delay(dht.getMinimumSamplingPeriod());

    temperature = dht.getTemperature();
    humidity = dht.getHumidity();

    if (isnan(temperature) || isnan(humidity)) {
      Serial.printf("DHT reading failed!\r\n");
      return;
    } else {
      Serial.printf("Temperature: %2.1f Celsius\tHumidity: %2.1f%%\r\n", temperature, humidity);
    }
}
Arduino IDE Serial Monitor will show the current temperature like this

Step 1 : Create a new device in Sinric Pro
- Login to your Sinric Pro account, go to Devices menu on your left and click Add Device button (On top left).
- Enter the device name Temperature Sensor, description My Temperature Sensor and select the device type as Temperature Sensor.
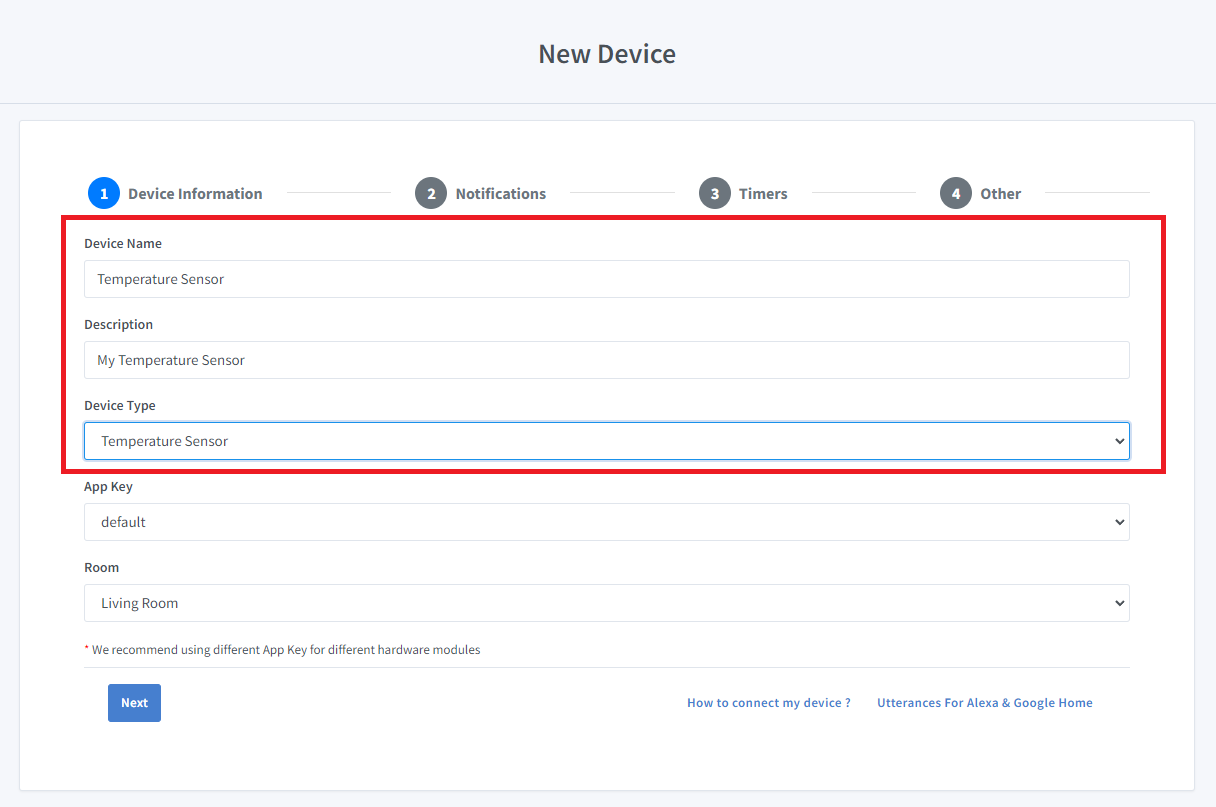
- Click Next the in the Notifications tab
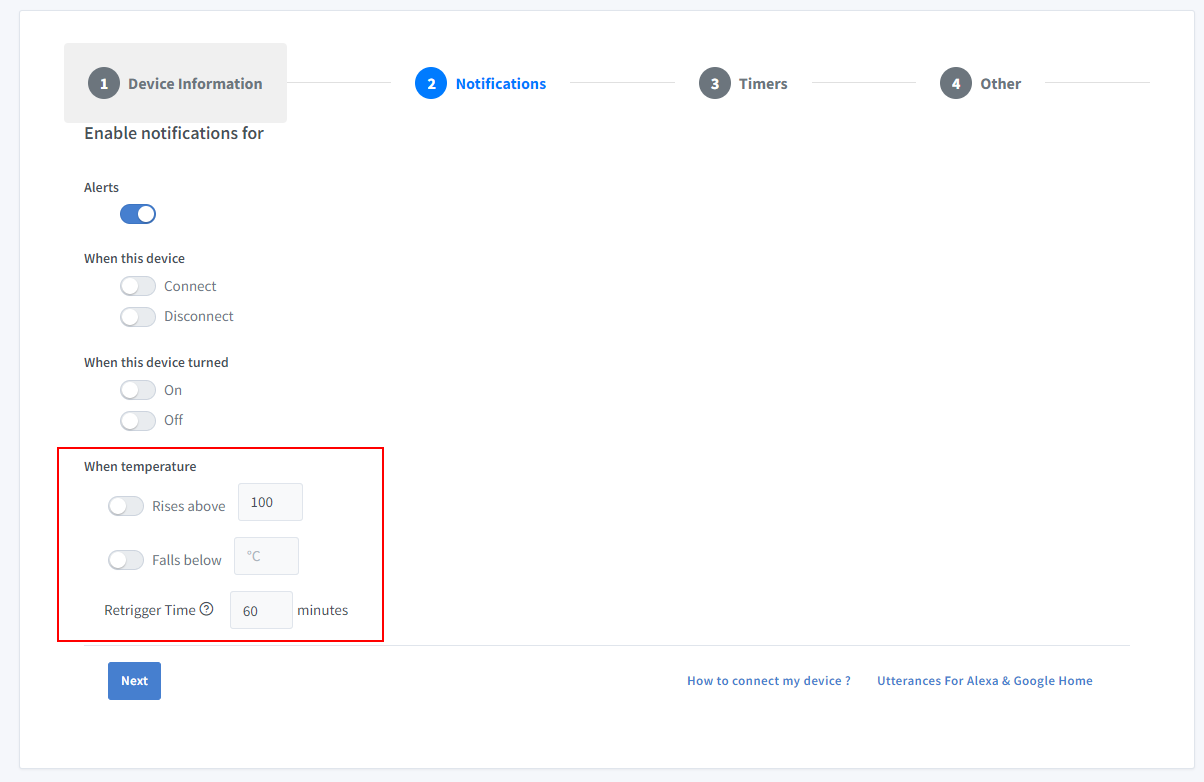
You can set the threshold here to receive a push notification via the Sinric Pro app when the temperature goes below or above a certain temperature. Use the Retrigger Time to set the delay between notifications.
-
Click Others tab and Click Save
-
Next screen will show the credentials required to connect the device you just created.
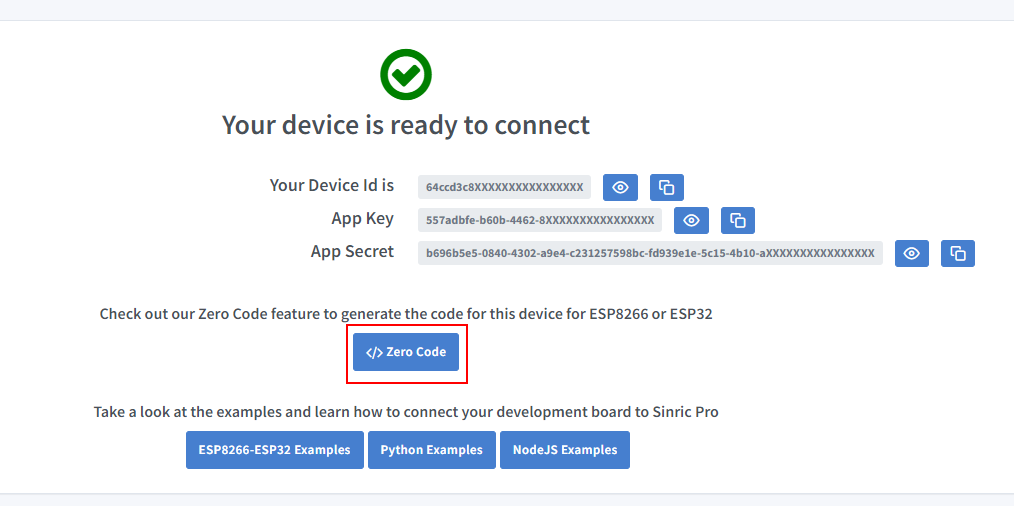
- Copy the Device Id, App Key and App Secret Keep these values secure. DO NOT SHARE THEM ON PUBLIC FORUMS !
Step 2 : Connect to Sinric Pro
Step 2.1 Install Sinric Pro Library

You can generate the code using Zero Code feature or write it by your self. If you do not have programming experice, we recommend to use Zero Code feature in the Portal to generate the code, download and flash.
2.2 Complete Code
// Uncomment the following line to enable serial debug output
//#define ENABLE_DEBUG

#ifdef ENABLE_DEBUG
  #define DEBUG_ESP_PORT Serial
  #define NODEBUG_WEBSOCKETS
  #define NDEBUG
#endif

#include <Arduino.h>
#if defined(ESP8266)
  #include <ESP8266WiFi.h>
#elif defined(ESP32) || defined(ARDUINO_ARCH_RP2040)
  #include <WiFi.h>
#endif

#include "SinricPro.h"
#include "SinricProTemperaturesensor.h"
#include "DHT.h" // https://github.com/markruys/arduino-DHT

#define WIFI_SSID         ""   // Your WiFI SSID name
#define WIFI_PASS         ""   // Your WiFi Password.
#define APP_KEY           ""   // Should look like "de0bxxxx-1x3x-4x3x-ax2x-5dabxxxxxxxx" (Get it from Portal -> Secrets)
#define APP_SECRET        ""   // Should look like "5f36xxxx-x3x7-4x3x-xexe-e86724a9xxxx-4c4axxxx-3x3x-x5xe-x9x3-333d65xxxxxx" (Get it from Portal -> Secrets)
#define TEMP_SENSOR_ID    ""   // Should look like "5dc1564130xxxxxxxxxxxxxx" (Get it from Portal -> Devices)
#define BAUD_RATE         115200              // Change baudrate to your need (used for serial monitor)
#define EVENT_WAIT_TIME   60000               // send event every 60 seconds

#if defined(ESP8266)
  #define DHT_PIN    D1
#elif defined(ESP32)
  #define DHT_PIN    16
#endif

DHT dht;                                      // DHT sensor

float temperature;                            // actual temperature
float humidity;                               // actual humidity
float lastTemperature;                        // last known temperature (for compare)
float lastHumidity;                           // last known humidity (for compare)

void handleTemperaturesensor() {
  if (SinricPro.isConnected() == false) {
    Serial.printf("Not connected to Sinric Pro...!\r\n");
    return;
  }

  static unsigned long last_millis;
  unsigned long        current_millis = millis();
  if (last_millis && current_millis - last_millis < EVENT_WAIT_TIME) return;
  last_millis = current_millis;

  temperature = dht.getTemperature();          // get actual temperature in °C
//  temperature = dht.getTemperature() * 1.8f + 32;  // get actual temperature in °F
  humidity = dht.getHumidity();                // get actual humidity

  if (isnan(temperature) || isnan(humidity)) { // reading failed...
    Serial.printf("DHT reading failed!\r\n");  // print error message
    return;                                    // try again next time
  }

  Serial.printf("Temperature: %2.1f Celsius\tHumidity: %2.1f%%\r\n", temperature, humidity);

  if (temperature == lastTemperature && humidity == lastHumidity) {
    Serial.printf("Temperature did not changed. do nothing...!\r\n");
    return;
  }

  SinricProTemperaturesensor &mySensor = SinricPro[TEMP_SENSOR_ID];  // get temperaturesensor device
  bool success = mySensor.sendTemperatureEvent(temperature, humidity); // send event
  if (success) {
    Serial.printf("Sent!\r\n");
  } else {
    Serial.printf("Something went wrong...could not send Event to server!\r\n"); // Enable ENABLE_DEBUG to see why
  }

  lastTemperature = temperature;  // save actual temperature for next compare
  lastHumidity = humidity;        // save actual humidity for next compare
}


// setup function for WiFi connection
void setupWiFi() {
  Serial.printf("\r\n[Wifi]: Connecting");

  #if defined(ESP8266)
    WiFi.setSleepMode(WIFI_NONE_SLEEP);
    WiFi.setAutoReconnect(true);
  #elif defined(ESP32)
    WiFi.setSleep(false);
    WiFi.setAutoReconnect(true);
  #endif

  WiFi.begin(WIFI_SSID, WIFI_PASS);

  while (WiFi.status() != WL_CONNECTED) {
    Serial.printf(".");
    delay(250);
  }
  IPAddress localIP = WiFi.localIP();
  Serial.printf("connected!\r\n[WiFi]: IP-Address is %d.%d.%d.%d\r\n", localIP[0], localIP[1], localIP[2], localIP[3]);
}

bool onPowerState(const String &deviceId, bool &state) {
  return true; // request handled properly
}

// setup function for SinricPro
void setupSinricPro() {
  // add device to SinricPro
  SinricProTemperaturesensor &mySensor = SinricPro[TEMP_SENSOR_ID];
  mySensor.onPowerState(onPowerState);

  // setup SinricPro
  SinricPro.onConnected([](){ Serial.printf("Connected to SinricPro\r\n"); });
  SinricPro.onDisconnected([](){ Serial.printf("Disconnected from SinricPro\r\n"); });
  //SinricPro.restoreDeviceStates(true); // Uncomment to restore the last known state from the server.
  SinricPro.begin(APP_KEY, APP_SECRET);
}

// main setup function
void setup() {
  Serial.begin(BAUD_RATE); Serial.printf("\r\n\r\n");
  dht.setup(DHT_PIN);

  setupWiFi();
  setupSinricPro();
}

void loop() {
  SinricPro.handle();
  handleTemperaturesensor();
}
Now you should be able to view the temperature via Sinric Pro App
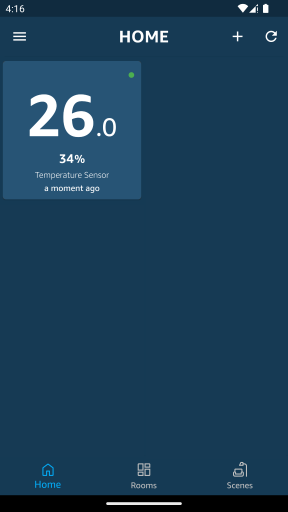
Charts via Portal

Alexa, Google Home and SmartThings

Please note that Google Home App shows the temperature sensor as a Thermostat due to Google Home limitations.
Troubleshooting
-
error: no matching function for call to ‘DHT::DHT()’ or error: ‘class DHT’ has no member named ‘getMinimumSamplingPeriod’
Solution: Please make sure correct DHT library is installed. This example was made with https://github.com/markruys/arduino-DHT. Remove any other DHT libraries you may have previously installed eg: https://github.com/adafruit/DHT-sensor-library
-
Compilation error: DHT.h: No such file or directory
Solution: Please make sure correct DHT library is installed.
-
Please refer to our Troubleshooting page for more details.
Related tutorials
- How to control an ESP32 or ESP8266 with Alexa and Google Home
- BME280 temperature and humidity sensor
- DS18B20 temperature sensor
- BMP180 temperature sensor
- LM35, LM335 and LM34 temperature sensor
This document is open source. See a typo? Please create an issue