


Timbre inteligente con ESP32, ESP8266 o Raspberry Pi Pico W para Alexa y Google Home
En esta sección vamos a crear un timbre con un pulsador (táctil) conectado a un ESP32, ESP8266 o Raspberry Pi Pico W para después recibir una notificación en Alexa, Google Home o la app Sinric Pro.
Requisitos previos :
- ESP32, ESP8266 o Raspberry Pi Pico W x 1.
- Pulsador x 1.
- Resistencia de 1K ~ 10K x 1
- Cables puente (jumper).
Cableado del pulsador del timbre
Vamos a cablear el pulsador con una configuración pull-down. Cuando se pulsa el botón, digitalRead lee una señal HIGH (1).
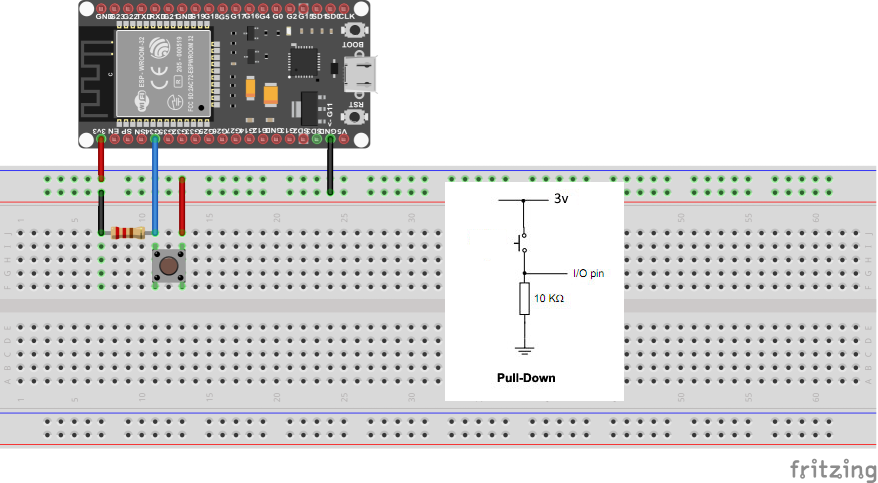
| MCU | Pin GPIO |
|---|---|
| ESP32 | 34 |
| ESP8266 | 4 (D2) |
| Pico W | 7 |
Leer el estado del pulsador
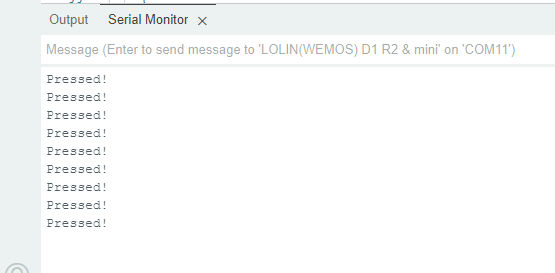
Vamos a comprobar que el sensor está bien cableado y funciona.
#if defined(ESP8266)
  #define BUTTON_PIN        D4
#elif defined(ESP32)
  #define BUTTON_PIN        34
#elif (ARDUINO_ARCH_RP2040)
  #define BUTTON_PIN        7
#endif

int button_state;
int lastbutton_state = LOW;

unsigned long last_debounce_time = 0;
unsigned long debounce_delay = 50; // increase if needed.

void setup() {
  Serial.begin(115200);
  pinMode(BUTTON_PIN, INPUT);
}

void handle_button_press() {
  int reading = digitalRead(BUTTON_PIN);
  if (reading != lastbutton_state) {
    last_debounce_time = millis();
  }

  if ((millis() - last_debounce_time) > debounce_delay) {
    if (reading != button_state) {
      button_state = reading;

      if (button_state == HIGH) {
        Serial.printf("Pressed!\r\n");
      }
    }
  }

  lastbutton_state = reading;
}

void loop() {
  handle_button_press();
}
Ver este código en GitHub Gist
Paso 1 : Conéctate a Sinric Pro
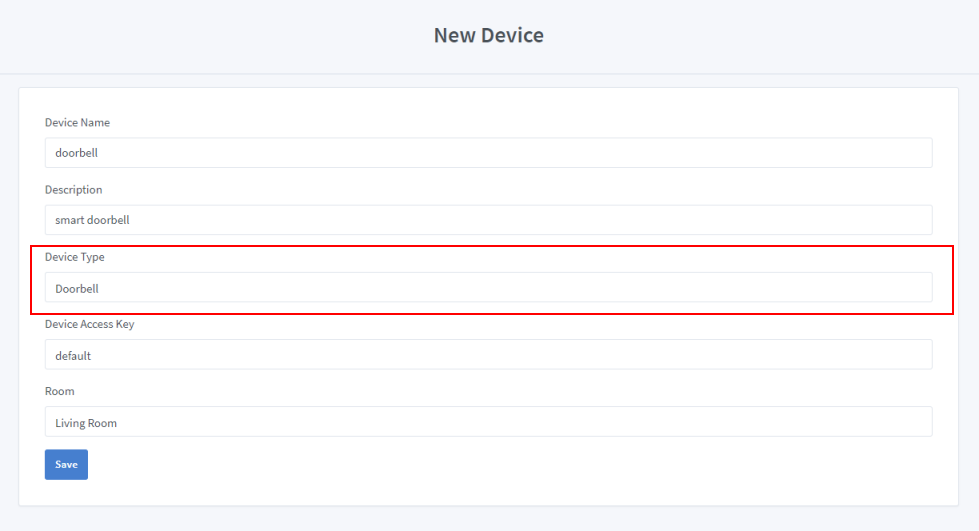
Crea un dispositivo nuevo: doorbell
-
Inicia sesión en tu cuenta de Sinric Pro y abre el menú Devices a la izquierda.
-
Haz clic en el botón Add Device (arriba a la izquierda).
-
Escribe el nombre del dispositivo doorbell, la descripción smart doorbell y selecciona el tipo Doorbell.
-
Haz clic en Save para crear el dispositivo
En cuanto hagas clic en el botón de guardar, Amazon Alexa detectará automáticamente el dispositivo que acabamos de crear (si ya habías vinculado nuestra skill de Alexa).
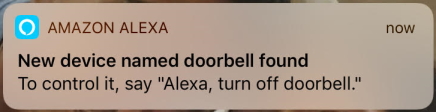
Si no has recibido la notificación push, pide a Alexa que descubra dispositivos
Paso 1.1 Instala la librería Sinric Pro

2.2 Código completo
// Uncomment the following line to enable serial debug output
//#define ENABLE_DEBUG

#ifdef ENABLE_DEBUG
  #define DEBUG_ESP_PORT Serial
  #define NODEBUG_WEBSOCKETS
  #define NDEBUG
#endif

#include <Arduino.h>
#if defined(ESP8266)
  #include <ESP8266WiFi.h>
#elif defined(ESP32) || defined(ARDUINO_ARCH_RP2040)
  #include <WiFi.h>
#endif

#include "SinricPro.h"
#include "SinricProDoorbell.h"

// Grab it from https://portal.sinric.pro.
#define APP_KEY    "" //Should look like "de0bxxxx-1x3x-4x3x-ax2x-5dabxxxxxxxx"
#define APP_SECRET "" //Should look like "5f36xxxx-x3x7-4x3x-xexe-e86724a9xxxx-4c4axxxx-3x3x-x5xe-x9x3-333d65xxxxxx"
#define DOORBELL_ID  "" //Should look like "6534xxxxxxxc08c6ea1b"

#define SSID       "" // Your WiFi SSID
#define PASS       "" // Your WiFi Password

#define BAUD_RATE         115200                // Change baudrate to your need

#if defined(ESP8266)
  #define BUTTON_PIN        D4
#elif defined(ESP32)
  #define BUTTON_PIN        34
#elif (ARDUINO_ARCH_RP2040)
  #define BUTTON_PIN        7
#endif

int button_state;
int lastbutton_state = LOW;

unsigned long last_debounce_time = 0;
unsigned long debounce_delay = 50; // increase if needed.
SinricProDoorbell& myDoorbell = SinricPro[DOORBELL_ID];

void handleButtonPress() {
  int reading = digitalRead(BUTTON_PIN);
  if (reading != lastbutton_state) {
    last_debounce_time = millis();
  }

  if ((millis() - last_debounce_time) > debounce_delay) {
    if (reading != button_state) {
      button_state = reading;

      if (button_state == HIGH) {
        Serial.printf("[handleButtonPress()]: Button pressed!\r\n");
        bool success = myDoorbell.sendDoorbellEvent();
        if(!success) {
          Serial.printf("[handleButtonPress()]: Something went wrong...could not send Event to server!\r\n");
        }
      }
    }
  }

  lastbutton_state = reading;
}

void setupWiFi() {
  Serial.printf("\r\n[setupWiFi()]: Connecting");

  #if defined(ESP8266)
    WiFi.setSleepMode(WIFI_NONE_SLEEP);
    WiFi.setAutoReconnect(true);
  #elif defined(ESP32)
    WiFi.setSleep(false);
    WiFi.setAutoReconnect(true);
  #endif

  WiFi.begin(WIFI_SSID, WIFI_PASS);

  while (WiFi.status() != WL_CONNECTED) {
    Serial.printf(".");
    delay(250);
  }
  IPAddress localIP = WiFi.localIP();
  Serial.printf("connected!\r\n[setupWiFi()]: IP-Address is %d.%d.%d.%d\r\n", localIP[0], localIP[1], localIP[2], localIP[3]);
}

void setupSinricPro() {
  SinricPro.onConnected([](){ Serial.printf("Connected to SinricPro\r\n"); });
  SinricPro.onDisconnected([](){ Serial.printf("Disconnected from SinricPro\r\n"); });
  SinricPro.begin(APP_KEY, APP_SECRET);
}

void setupButton() {
  pinMode(BUTTON_PIN, INPUT);
}

void setup() {
  Serial.begin(BAUD_RATE); Serial.printf("\r\n\r\n");
  setupButton();
  setupWiFi();
  setupSinricPro();
}

void loop() {
  handleButtonPress();
  SinricPro.handle();
}
Ver este código en GitHub Gist
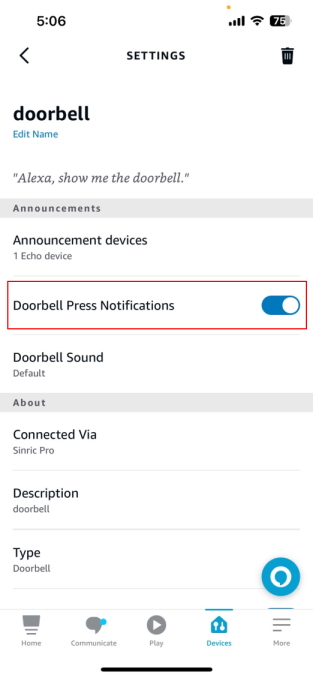
Nota: las notificaciones de timbre de Alexa están desactivadas de forma predeterminada. Tienes que activarlas en la app para recibir la notificación DingDong en Alexa.
Solución de problemas
-
¿El pulsador es demasiado sensible? Puedes ajustar
debounce_delayo probar la solución propuesta en issues/346 -
Consulta nuestra página de Solución de problemas para ver posibles soluciones a tu problema.
Tutoriales relacionados
- Cómo controlar un ESP32 o ESP8266 con Alexa y Google Home
- Sensor de contacto para puertas y ventanas
- Sensor de movimiento PIR (HC-SR501, HC-SR505, AM312)
- Cámara WebRTC con Raspberry Pi
Este documento es de código abierto. ¿Has visto una errata? Crea una issue