


Sensor de temperatura LM35, LM335 y LM34 con ESP32 o ESP8266 para Alexa
En esta sección vamos a crear un sensor de temperatura con un ESP32 o ESP8266 para después consultar la temperatura con Alexa, Google Home o SmartThings.
Requisitos previos :
- ESP32, ESP8266 x 1.
- LM35, LM335 y LM34 x 1.
- Cables puente (jumper).
Breve introducción al sensor de temperatura
Los sensores de temperatura LM35/LM34 son sensores de temperatura lineales de circuito integrado que funcionan midiendo la caída de tensión entre la base y el emisor de un transistor conectado como diodo. La caída de tensión entre la base y el emisor de un transistor conectado como diodo disminuye a un ritmo conocido a medida que aumenta la temperatura.
-
El LM35 mide la temperatura en grados Celsius (°C)
-
El LM34 mide la temperatura en grados Fahrenheit (ºF).
-
El LM335 mide la temperatura en Kelvin (ºK)
LM35, LM335 y LM34: ¿cuál es la diferencia?
Los tres sensores dan una tensión analógica que aumenta 10 mV por grado. Se diferencian en la escala de temperatura, la tensión de alimentación y la forma de cablearlos.
| LM35 | LM34 | LM335 | |
|---|---|---|---|
| Escala de salida | 10 mV por °C | 10 mV por °F | 10 mV por K |
| Salida a 25 °C (77 °F) | 0.25 V | 0.77 V | 2.98 V |
| Tipo de sensor | 3 pines, salida de tensión | 3 pines, salida de tensión | 2 terminales (tipo zener) con un pin de ajuste |
| Alimentación | De 4 V a 30 V | De 5 V a 30 V | Corriente de polarización a través de una resistencia |
| Componentes adicionales | Ninguno | Ninguno | Resistencia pull-up (de polarización) |
| Calibración | Ajustado de fábrica | Ajustado de fábrica | Se puede ajustar con el pin ADJ |
¿Cuál deberías usar?
- LM35: la opción más sencilla si quieres grados Celsius. La lectura es la salida en milivoltios dividida entre 10.
- LM34: el mismo sensor para Fahrenheit. Úsalo si quieres °F sin hacer conversiones.
- LM335: la salida está en Kelvin, así que resta 273.15 para obtener grados Celsius. Necesita una resistencia pull-up, y la salida ronda los 3 V a temperatura ambiente, por lo que necesita un rango del ADC más amplio que el LM35.
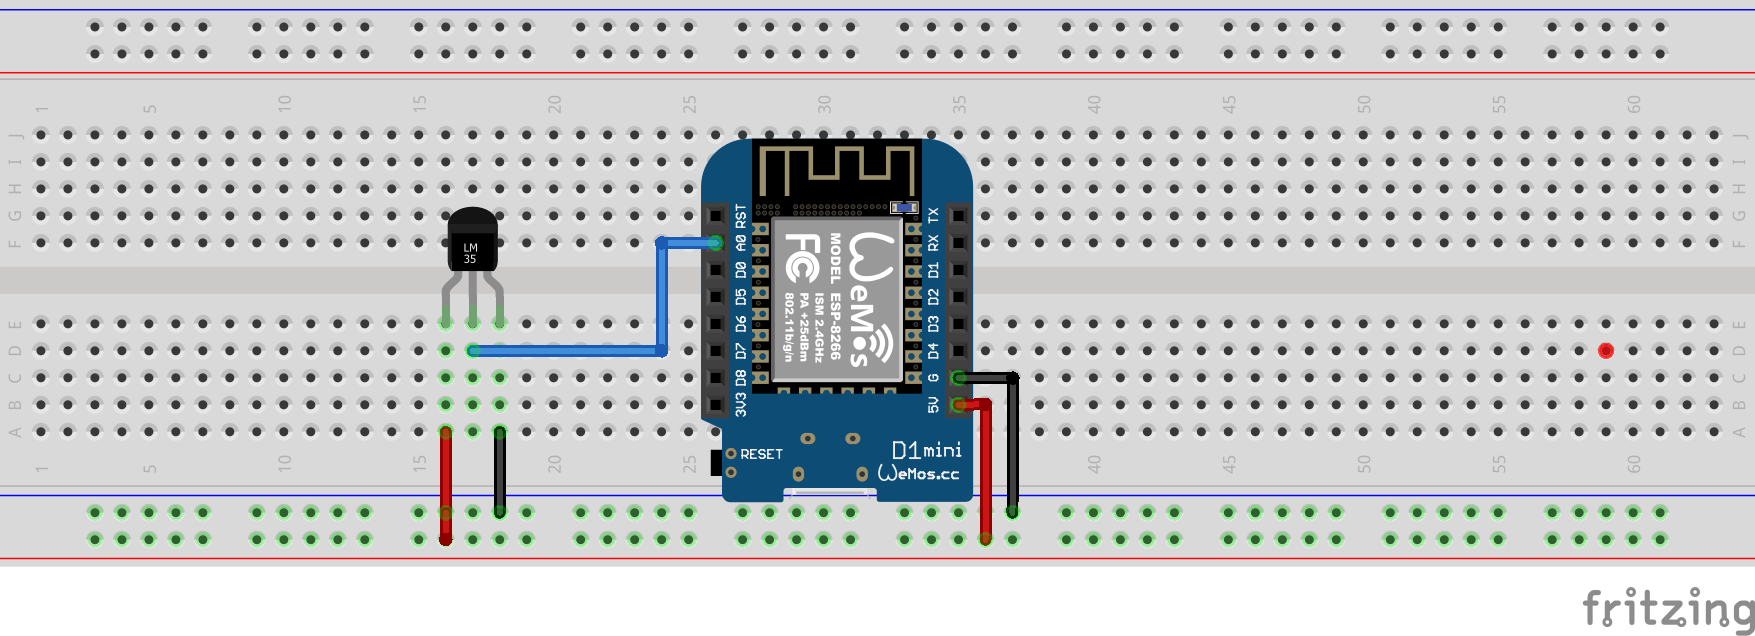
El LM35 y el LM34 necesitan al menos 4 V y 5 V, así que aliméntalos desde el pin 5V / VIN, no desde 3.3V.
Pinout del LM35, LM34 y LM335
Sujeta el encapsulado TO-92 con la cara plana hacia ti y las patillas hacia abajo. De izquierda a derecha:
| Sensor | Pin 1 (izquierda) | Pin 2 (centro) | Pin 3 (derecha) |
|---|---|---|---|
| LM35 | +Vs (alimentación) | Vout | GND |
| LM34 | +Vs (alimentación) | Vout | GND |
| LM335 | ADJ (déjalo sin conectar) | + (salida) | − (GND) |
Convertir la lectura en una temperatura
// ADC_VREF_MV: ADC reference voltage in millivolts, ADC_RESOLUTION: 4096 on ESP32, 1024 on ESP8266
float millivolts = analogRead(ADC_PIN) * (ADC_VREF_MV / ADC_RESOLUTION);

float lm35_celsius    = millivolts / 10.0;           // LM35
float lm34_fahrenheit = millivolts / 10.0;           // LM34
float lm335_celsius   = (millivolts / 10.0) - 273.15; // LM335 (Kelvin to Celsius)
Cableado del LM35 o LM34 con ESP8266
Cableado del LM335 con ESP8266
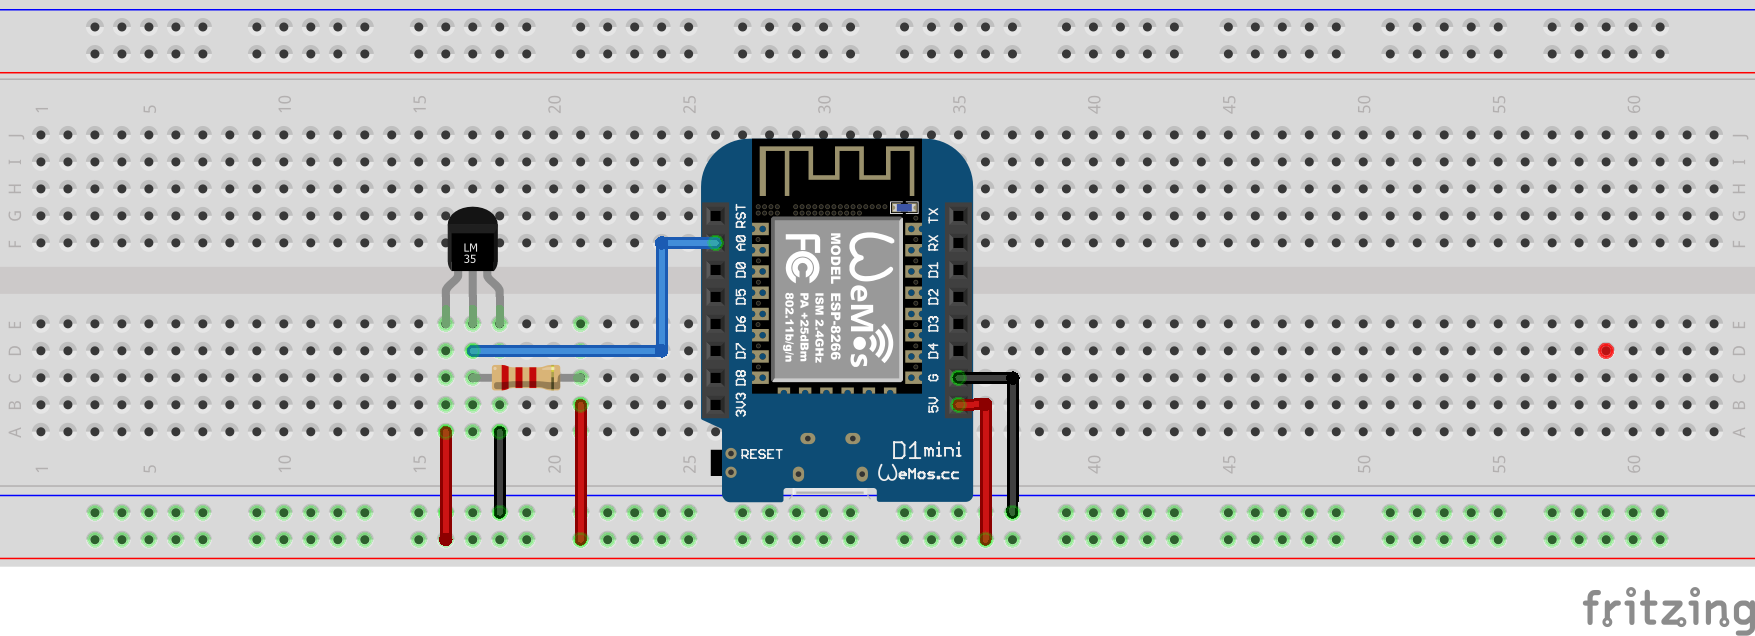
Pull-up mediante una resistencia de 2.2k ohmios
| MCU | Pin GPIO |
|---|---|
| ESP32 | 36 (ADC0) |
| ESP8266 | A0 (ADC0) |
Vamos a comprobar que el sensor de temperatura está bien cableado y funciona.
#if defined(ESP8266)
  #define LM_PIN    A0
#elif defined(ESP32)
  #define LM_PIN    36
#endif

#define ADC_VREF_mV    5000.0 // 5000 is the voltage provided by MCU. If you connect to 3V change to 3000
#define ADC_RESOLUTION 4096.0

void setup() {
  Serial.begin(9600);
}

float getTemperature() {
  #if defined(ESP8266)
    int analogValue = analogRead(LM_PIN);
    float millivolts = (analogValue / 1024.0) * ADC_VREF_mV;
    float temperature = millivolts / 10;
    // float fahrenheit = ((temperature * 9) / 5 + 32);
    return temperature;
  #elif defined(ESP32)
    int adcVal = analogRead(LM_PIN);
    float milliVolt = adcVal * (ADC_VREF_mV / ADC_RESOLUTION);
    float temperature = milliVolt / 10;
    return temperature;
  #endif
}

void loop()
{
  float temperature = getTemperature();
  Serial.printf("Temperature: %2.1f °C\r\n", temperature);
  delay(1000);
}
Ver este código en GitHub Gist
Paso 1 : Crea un dispositivo nuevo en Sinric Pro
- Inicia sesión en tu cuenta de Sinric Pro, abre el menú Devices a la izquierda y haz clic en el botón Add Device (arriba a la izquierda).
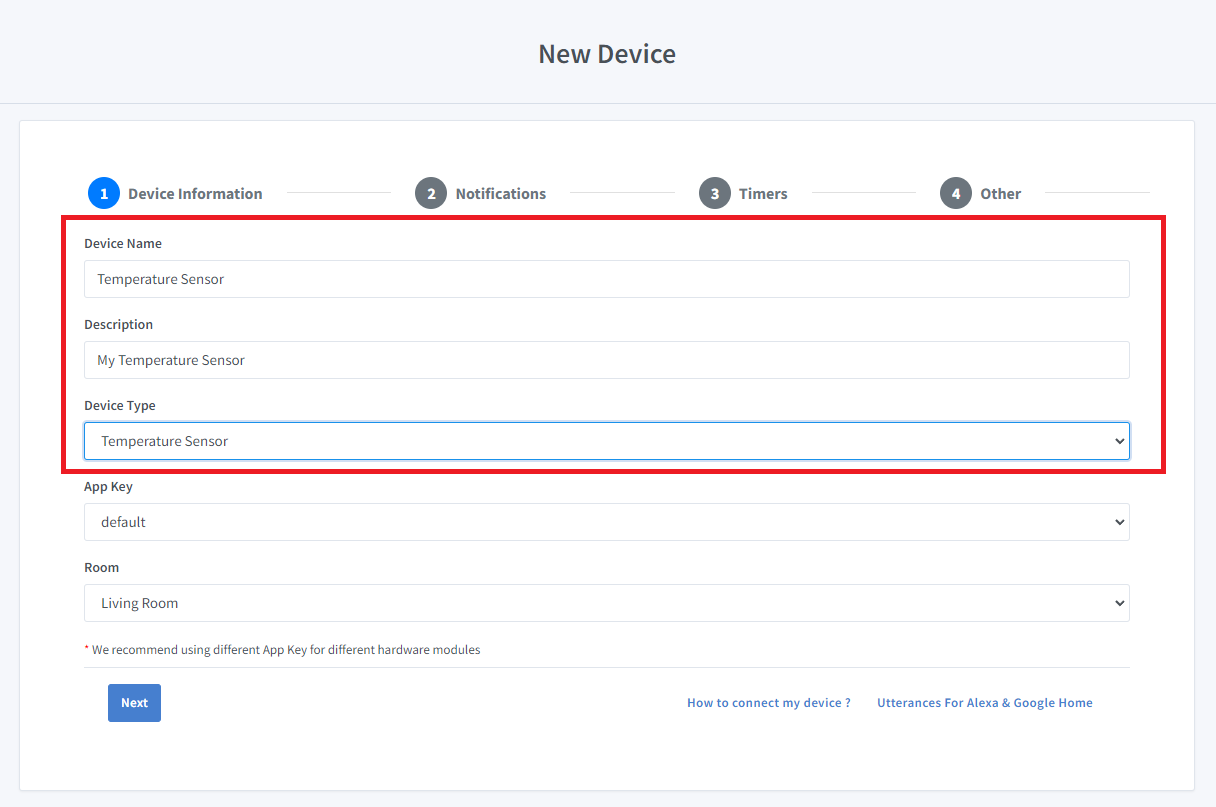
- Escribe el nombre del dispositivo Temperature Sensor, la descripción My Temperature Sensor y selecciona el tipo de dispositivo Temperature Sensor.
- Haz clic en Next en la pestaña Notifications
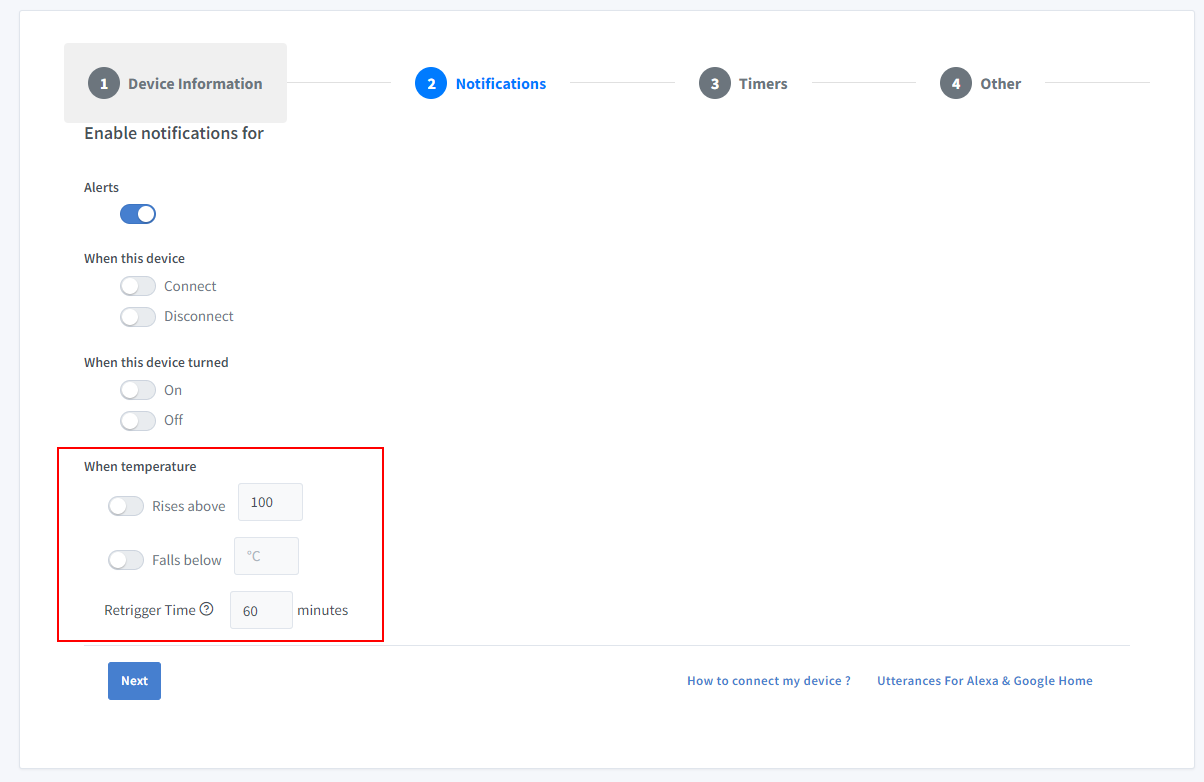
Aquí puedes establecer el umbral para recibir una notificación push en la app Sinric Pro cuando la temperatura esté por debajo o por encima de un determinado valor. Usa Retrigger Time para definir el tiempo de espera entre notificaciones.
-
Haz clic en la pestaña Others y después en Save
-
La siguiente pantalla muestra las credenciales necesarias para conectar el dispositivo que acabas de crear.
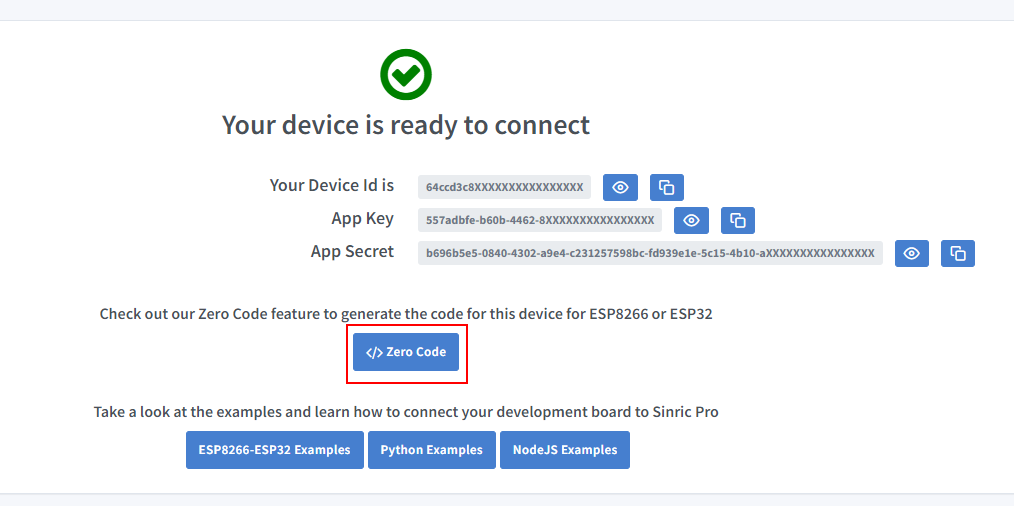
- Copia Device Id, App Key y App Secret Mantén estos valores seguros. ¡NO LOS COMPARTAS EN FOROS PÚBLICOS!
Paso 2 : Conéctate a Sinric Pro
Paso 2.1 Instala la librería Sinric Pro

Puedes generar el código con la función Zero Code o escribirlo tú mismo. Si no tienes experiencia en programación, te recomendamos usar la función Zero Code del Portal para generar el código, descargarlo y grabarlo en la placa.
2.2 Código completo
#ifdef ENABLE_DEBUG
  #define DEBUG_ESP_PORT Serial
  #define NODEBUG_WEBSOCKETS
  #define NDEBUG
#endif

#include <Arduino.h>
#if defined(ESP8266)
  #include <ESP8266WiFi.h>
#elif defined(ESP32)
  #include <WiFi.h>
#endif

#if defined(ESP8266)
  #define LM_PIN    A0
#elif defined(ESP32)
  #define LM_PIN    36
#endif


#include "SinricPro.h"
#include "SinricProTemperaturesensor.h"

#define WIFI_SSID         ""   // Your WiFI SSID name
#define WIFI_PASS         ""   // Your WiFi Password.
#define APP_KEY           ""   // Should look like "de0bxxxx-1x3x-4x3x-ax2x-5dabxxxxxxxx" (Get it from Portal -> Secrets)
#define APP_SECRET        ""   // Should look like "5f36xxxx-x3x7-4x3x-xexe-e86724a9xxxx-4c4axxxx-3x3x-x5xe-x9x3-333d65xxxxxx" (Get it from Portal -> Secrets)
#define TEMP_SENSOR_ID    ""   // Should look like "5dc1564130xxxxxxxxxxxxxx" (Get it from Portal -> Devices)
#define BAUD_RATE         115200              // Change baudrate to your need (used for serial monitor)
#define EVENT_WAIT_TIME   60000               // send event every 60 seconds

float temperature;                            // actual temperature
float humidity;                               // actual humidity
float lastTemperature;                        // last known temperature (for compare)

#define ADC_VREF_mV    5000.0 // 5000 is the voltage provided by MCU. If you connect to 3V change to 3000
#define ADC_RESOLUTION 4096.0

float getTemperature() {
  #if defined(ESP8266)
    int analogValue = analogRead(LM_PIN);
    float millivolts = (analogValue / 1024.0) * ADC_VREF_mV;
    float temperature = millivolts / 10;
    // float fahrenheit = ((temperature * 9) / 5 + 32);
    return temperature;
  #elif defined(ESP32)
    int adcVal = analogRead(LM_PIN);
    float milliVolt = adcVal * (ADC_VREF_mV / ADC_RESOLUTION);
    float temperature = milliVolt / 10;
    return temperature;
  #endif
}

void handleTemperaturesensor() {
  if (SinricPro.isConnected() == false) {
    Serial.printf("Not connected to Sinric Pro...!\r\n");
    return;
  }

  static unsigned long last_millis;
  unsigned long        current_millis = millis();
  if (last_millis && current_millis - last_millis < EVENT_WAIT_TIME) return;
  last_millis = current_millis;

  float temperature = getTemperature();

  Serial.printf("Temperature: %2.1f °C\r\n", temperature);

  if (isnan(temperature)) { // reading failed...
    Serial.printf("reading failed!\r\n");  // print error message
    return;                                    // try again next time
  }

  if (temperature == lastTemperature) {
    Serial.printf("Temperature did not changed. do nothing...!\r\n");
    return;
  }

  SinricProTemperaturesensor &mySensor = SinricPro[TEMP_SENSOR_ID];  // get temperaturesensor device
  bool success = mySensor.sendTemperatureEvent(temperature, -1); // send event
  if (success) {
    Serial.printf("Sent!\r\n");
  } else {
    Serial.printf("Something went wrong...could not send Event to server!\r\n"); // Enable ENABLE_DEBUG to see why
  }

  lastTemperature = temperature;  // save actual temperature for next compare
}


// setup function for WiFi connection
void setupWiFi() {
  Serial.printf("\r\n[Wifi]: Connecting");

  #if defined(ESP8266)
    WiFi.setSleepMode(WIFI_NONE_SLEEP);
    WiFi.setAutoReconnect(true);
  #elif defined(ESP32)
    WiFi.setSleep(false);
    WiFi.setAutoReconnect(true);
  #endif

  WiFi.begin(WIFI_SSID, WIFI_PASS);

  while (WiFi.status() != WL_CONNECTED) {
    Serial.printf(".");
    delay(250);
  }
  IPAddress localIP = WiFi.localIP();
  Serial.printf("connected!\r\n[WiFi]: IP-Address is %d.%d.%d.%d\r\n", localIP[0], localIP[1], localIP[2], localIP[3]);
}

bool onPowerState(const String &deviceId, bool &state) {
  return true; // request handled properly
}

// setup function for SinricPro
void setupSinricPro() {
  // add device to SinricPro
  SinricProTemperaturesensor &mySensor = SinricPro[TEMP_SENSOR_ID];
  mySensor.onPowerState(onPowerState);

  // setup SinricPro
  SinricPro.onConnected([](){ Serial.printf("Connected to SinricPro\r\n"); });
  SinricPro.onDisconnected([](){ Serial.printf("Disconnected from SinricPro\r\n"); });
  //SinricPro.restoreDeviceStates(true); // Uncomment to restore the last known state from the server.
  SinricPro.begin(APP_KEY, APP_SECRET);
}

// main setup function
void setup() {
  Serial.begin(BAUD_RATE); Serial.printf("\r\n\r\n");

  setupWiFi();
  setupSinricPro();
}

void loop() {
  SinricPro.handle();
  handleTemperaturesensor();
}
Ver este código en GitHub Gist
Ahora deberías poder ver la temperatura en la app Sinric Pro
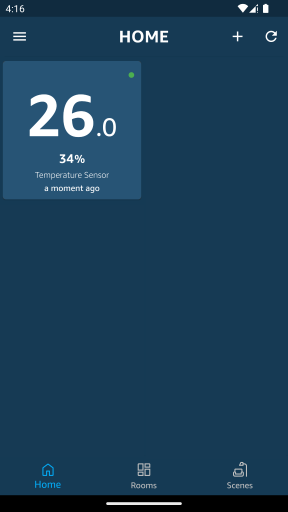
Ten en cuenta que la app Google Home muestra el sensor de temperatura como un termostato debido a las limitaciones de Google Home.
Solución de problemas
- Consulta nuestra página de Solución de problemas para más detalles.
Tutoriales relacionados
- Cómo controlar un ESP32 o ESP8266 con Alexa y Google Home
- Sensor de temperatura y humedad DHT11, DHT22, AM2302
- Sensor de temperatura DS18B20
- Sensor de temperatura y humedad BME280
- Sensor de temperatura BMP180
Este documento es de código abierto. ¿Has visto una errata? Crea una issue