


Tutorial de Sensor de Contato (MC-38) para ESP8266, ESP32, Raspberry Pi Pico W
Nesta seção, mostraremos como criar um sensor de contato (também conhecido como sensor de porta, sensor de entrada ou sensor de janela) usando ESP32, ESP8266 ou Raspberry Pi Pico W, e depois ver o estado aberto/fechado na Alexa, Google Home, SmartThings ou no aplicativo Sinric Pro.
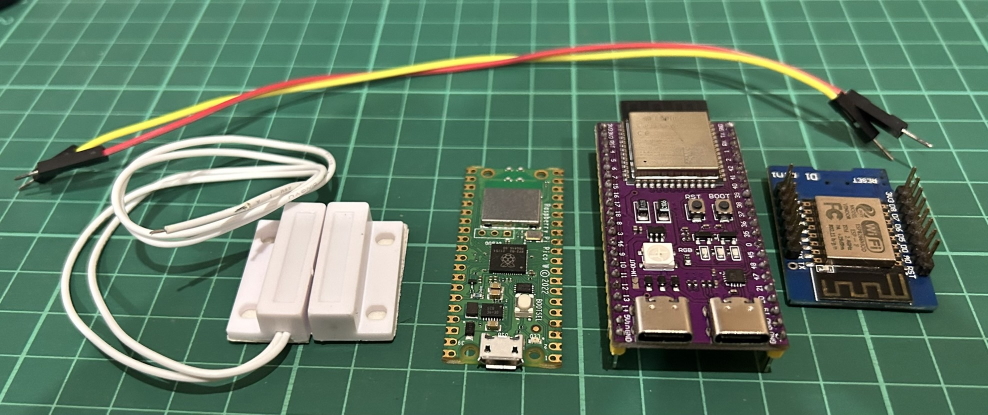
Pré-requisitos:
- ESP32, ESP8266 ou Raspberry Pi Pico W x 1.
- Sensor de Contato (MC-38) x 1.
- Cabos jumper.
Introdução rápida ao Sensor de Contato
Um sensor de contato é um dispositivo que detecta se uma porta, janela ou outro objeto está aberto ou fechado. Um sensor de contato compreende dois componentes – um sensor e um ímã – usados para determinar o status de objetos como portas ou janelas, se estão abertos ou fechados.
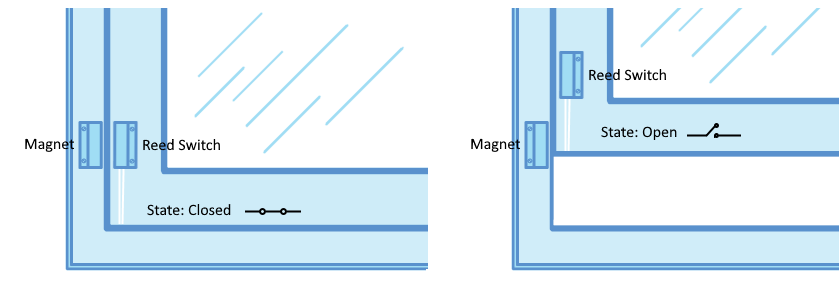
O sensor é fixado na moldura da janela deslizante, enquanto o ímã é anexado à própria janela. Quando a janela deslizante está fechada, o ímã fica próximo ao sensor, estabelecendo uma conexão entre os dois componentes. Por outro lado, quando a janela deslizante é aberta, o ímã se afasta do sensor, quebrando a conexão entre eles.
Conectando o Sensor de Contato
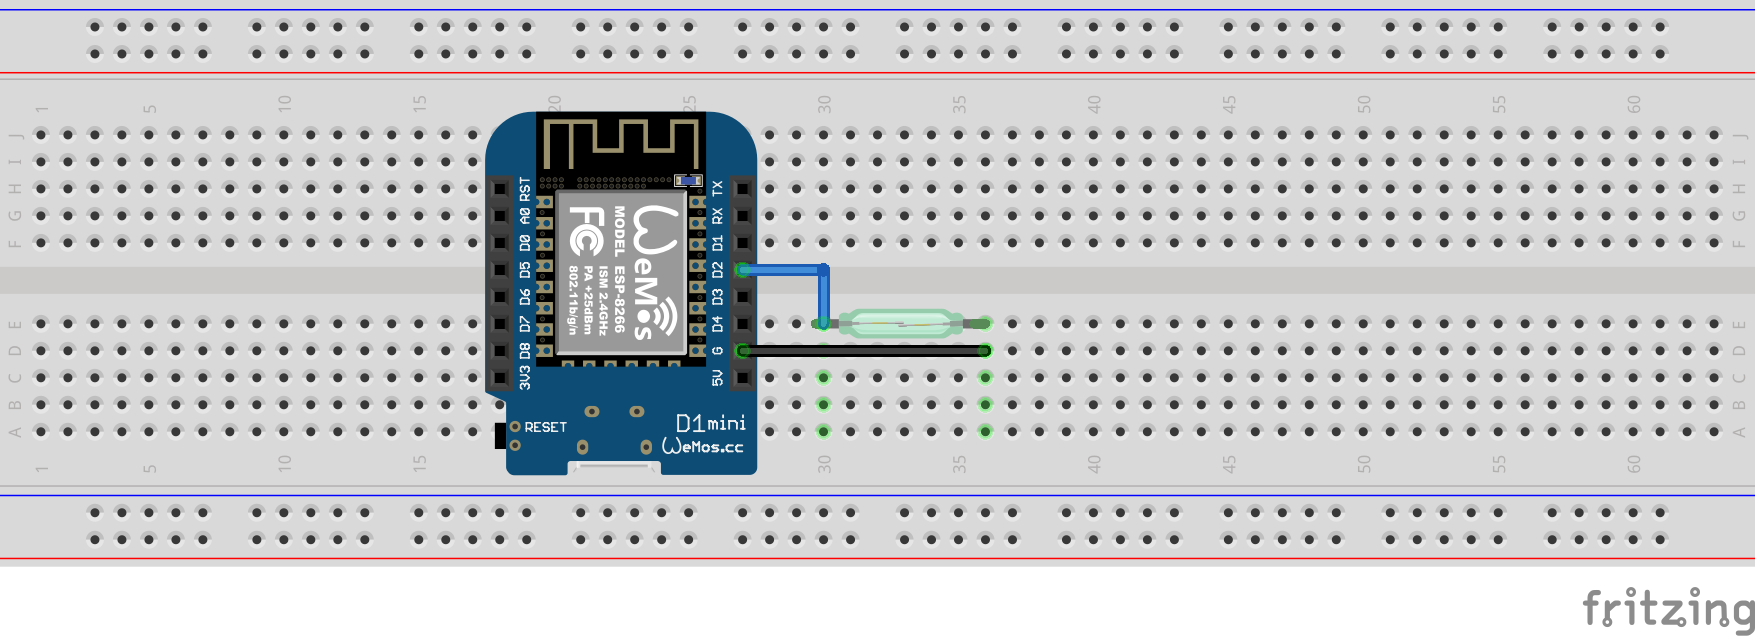
Nota: Estamos usando INPUT_PULLUP em vez de conectar um resistor de 10kΩ entre o reed switch e GND.
| MCU | Pino GPIO |
|---|---|
| ESP32 | 19 |
| ESP8266 | 4 (D2) |
| Pico W | GP5 |
Vamos verificar se o sensor de contato está conectado corretamente e funcionando.
#if defined(ESP8266)
  #define SENSOR_PIN        D2
#elif defined(ESP32)
  #define SENSOR_PIN        26
#elif (ARDUINO_ARCH_RP2040)
  #define SENSOR_PIN        5
#endif

int newState;
int oldState;

void setup() {
  Serial.begin(9600);
  pinMode(SENSOR_PIN, INPUT_PULLUP);

  oldState = digitalRead(SENSOR_PIN); // read the starting state
}

void loop() {
  newState = digitalRead(SENSOR_PIN); // read current state

  if(oldState != newState) {
    if (newState == HIGH) {
      Serial.println("Sliding window is open");
    } else {
      Serial.println("Sliding window is closed");
    }
    oldState = newState;
  }
}
Passo 1: Criar um novo Sensor de Contato no Sinric Pro
- Faça login na sua conta Sinric Pro, vá ao menu Dispositivos à esquerda e clique no botão Adicionar Dispositivo (no canto superior esquerdo).
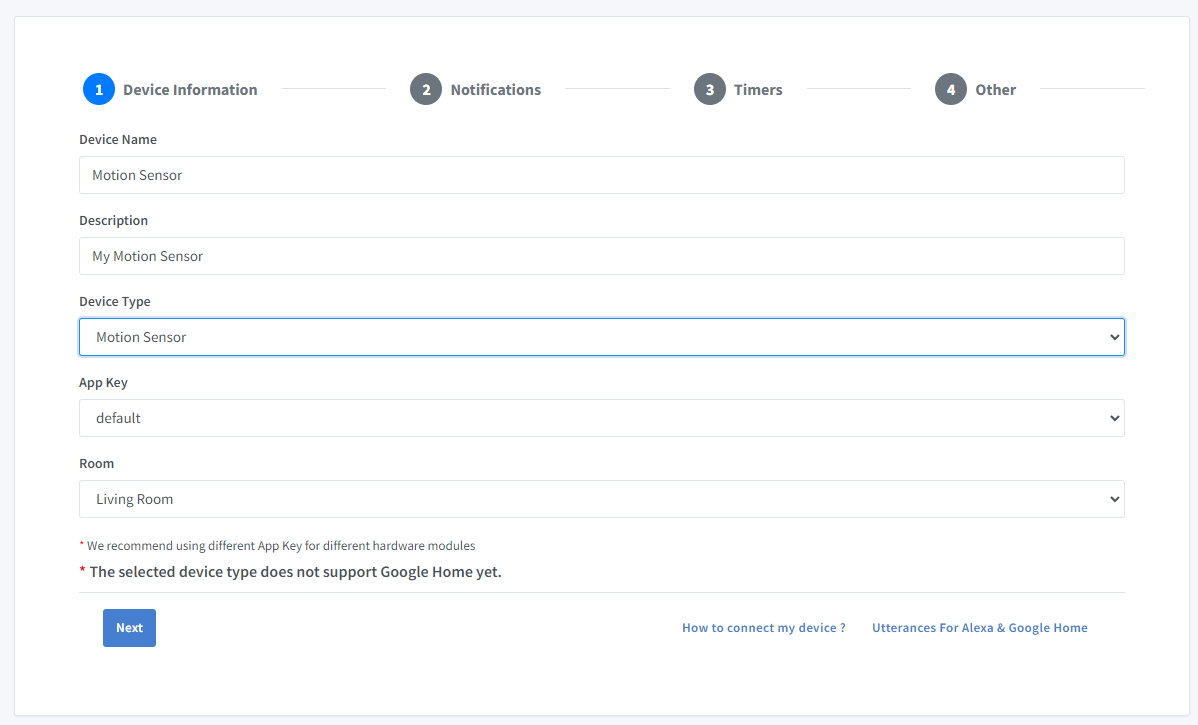
- Digite o nome do dispositivo Porta da Frente, descrição Minha Porta da Frente e selecione o tipo de dispositivo como Contact Sensor.
- Clique em Próximo na aba Notificações
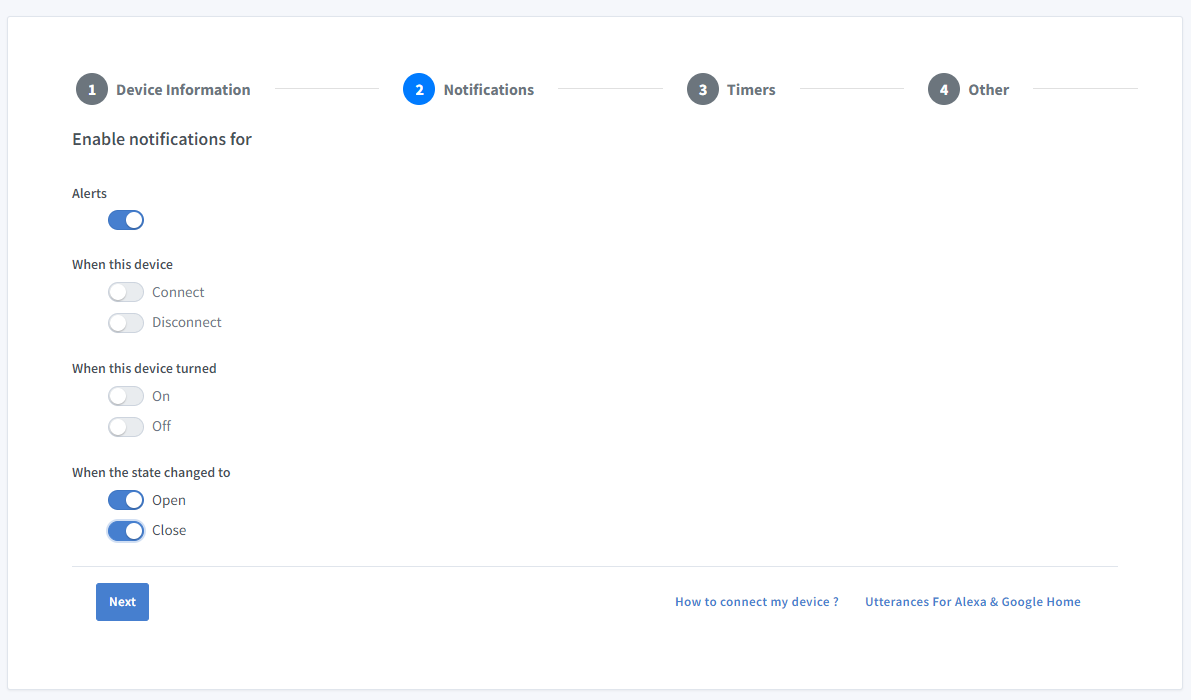
Para receber notificações push quando seu dispositivo abrir ou fechar, habilite a opção “Abrir e Fechar” no aplicativo Sinric Pro.
-
Clique em Outros e Clique em Salvar
-
A próxima tela mostrará as credenciais necessárias para conectar o dispositivo que você acabou de criar.
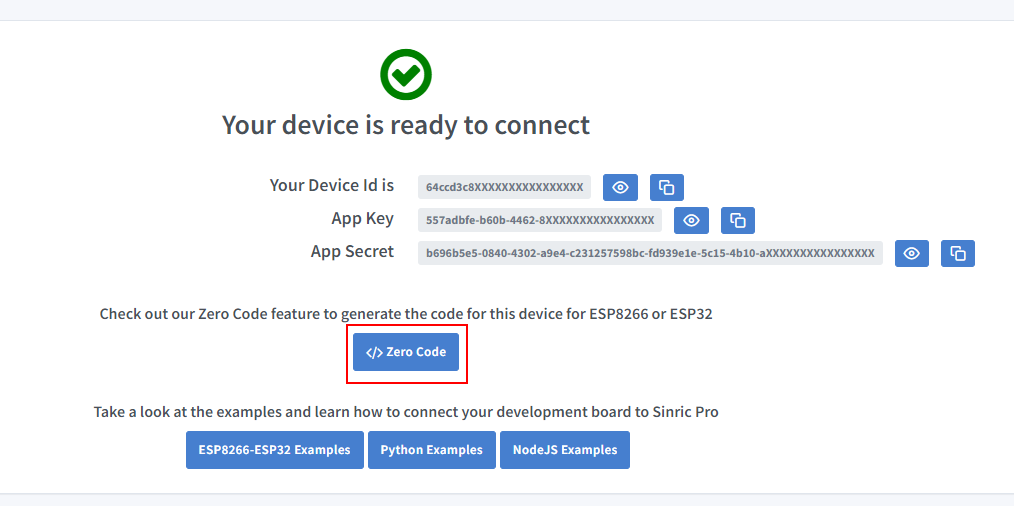
- Copie o ID do Dispositivo, Chave do App e Segredo do App Mantenha esses valores seguros. NÃO OS COMPARTILHE EM FÓRUNS PÚBLICOS!
Passo 2: Programação
2.1 Instalar a Biblioteca Sinric Pro

2.2 Código Completo
#ifdef ENABLE_DEBUG
  #define DEBUG_ESP_PORT Serial
  #define NODEBUG_WEBSOCKETS
  #define NDEBUG
#endif

#include <Arduino.h>
#if defined(ESP8266)
  #include <ESP8266WiFi.h>
#elif defined(ESP32) || defined(ARDUINO_ARCH_RP2040)
  #include <WiFi.h>
#endif

#if defined(ESP8266)
  #define SENSOR_PIN        D2
#elif defined(ESP32)
  #define SENSOR_PIN        26
#elif (ARDUINO_ARCH_RP2040)
  #define SENSOR_PIN        5
#endif

#include "SinricPro.h"
#include "SinricProContactsensor.h"

#define WIFI_SSID         ""   // Your WiFI SSID name
#define WIFI_PASS         ""   // Your WiFi Password.
#define APP_KEY           ""   // Should look like "de0bxxxx-1x3x-4x3x-ax2x-5dabxxxxxxxx" (Get it from Portal -> Secrets)
#define APP_SECRET        ""   // Should look like "5f36xxxx-x3x7-4x3x-xexe-e86724a9xxxx-4c4axxxx-3x3x-x5xe-x9x3-333d65xxxxxx" (Get it from Portal -> Secrets)
#define CONTACT_ID        ""   // Should look like "5dc1564130xxxxxxxxxxxxxx" (Get it from Portal -> Devices)
#define BAUD_RATE         115200              // Change baudrate to your need (used for serial monitor)

int actualContactState;
int lastContactState;

void handleContactSensor() {
  actualContactState = digitalRead(SENSOR_PIN); // read current state
  // If inverted change to !digitalRead(SENSOR_PIN)

  if (actualContactState != lastContactState) {         // if state has changed
    Serial.printf("Contact Sensor is %s now\r\n", actualContactState ? "open":"closed");
    lastContactState = actualContactState;              // update last known state

    SinricProContactsensor &myContact = SinricPro[CONTACT_ID]; // get contact sensor device

    // actualContactState == true then contact is closed
    // actualContactState == false then contact is open
    myContact.sendContactEvent(!actualContactState);      // send event with actual state
  }
}

// setup function for WiFi connection
void setupWiFi() {
  Serial.printf("\r\n[Wifi]: Connecting");

  #if defined(ESP8266)
    WiFi.setSleepMode(WIFI_NONE_SLEEP);
    WiFi.setAutoReconnect(true);
  #elif defined(ESP32)
    WiFi.setSleep(false);
    WiFi.setAutoReconnect(true);
  #endif

  WiFi.begin(WIFI_SSID, WIFI_PASS);

  while (WiFi.status() != WL_CONNECTED) {
    Serial.printf(".");
    delay(250);
  }
  IPAddress localIP = WiFi.localIP();
  Serial.printf("connected!\r\n[WiFi]: IP-Address is %d.%d.%d.%d\r\n", localIP[0], localIP[1], localIP[2], localIP[3]);
}
Passo 3: Vincular a Skill Sinric Pro da Alexa com sua conta.
- Abra seu aplicativo Amazon Alexa.
- Vá para Skills & Games.
- Pesquise por Sinric Pro.
- Clique em ATIVAR PARA USAR.
- Digite suas credenciais do Sinric Pro na página de vinculação.
- Peça à Alexa para descobrir novos dispositivos.
- Agora você pode perguntar à Alexa o status do Sensor de Contato: “Alexa, a porta da frente está aberta?”
Passo 4: Vincular a ação Sinric Pro do Google Home com sua conta.
- Abra o Google Home e clique em Adicionar.
- Selecione Configurar Dispositivo
- Selecione Funciona com Google Home
- Pesquise por Sinric Pro.
- Vincule sua conta.
- Descubra novos dispositivos
- Agora você pode perguntar ao Google Home o status do Sensor de Contato: “Ok Google, a porta da frente está aberta?”
Passo 5: Vincular Sinric Pro SmartThings com sua conta.
- Abra o aplicativo SmartThings e toque no ícone +
- Selecione Dispositivo
- Selecione Sinric Pro em Por Marca
- Vincule sua conta.
- Agora você pode ver o status do Sensor de Contato no painel
Solução de Problemas
Consulte nossa página de Solução de Problemas para possíveis soluções para seu problema.
Este documento é código aberto. Viu um erro de digitação? Por favor, crie uma issue