

SinricPro Device Creation Wizard Guide
This document provides a step-by-step guide for creating a new device using the SinricPro platform. The process is divided into four main sections: Device Information, Notifications, Timers, and Other settings.
Step 1: Device Information
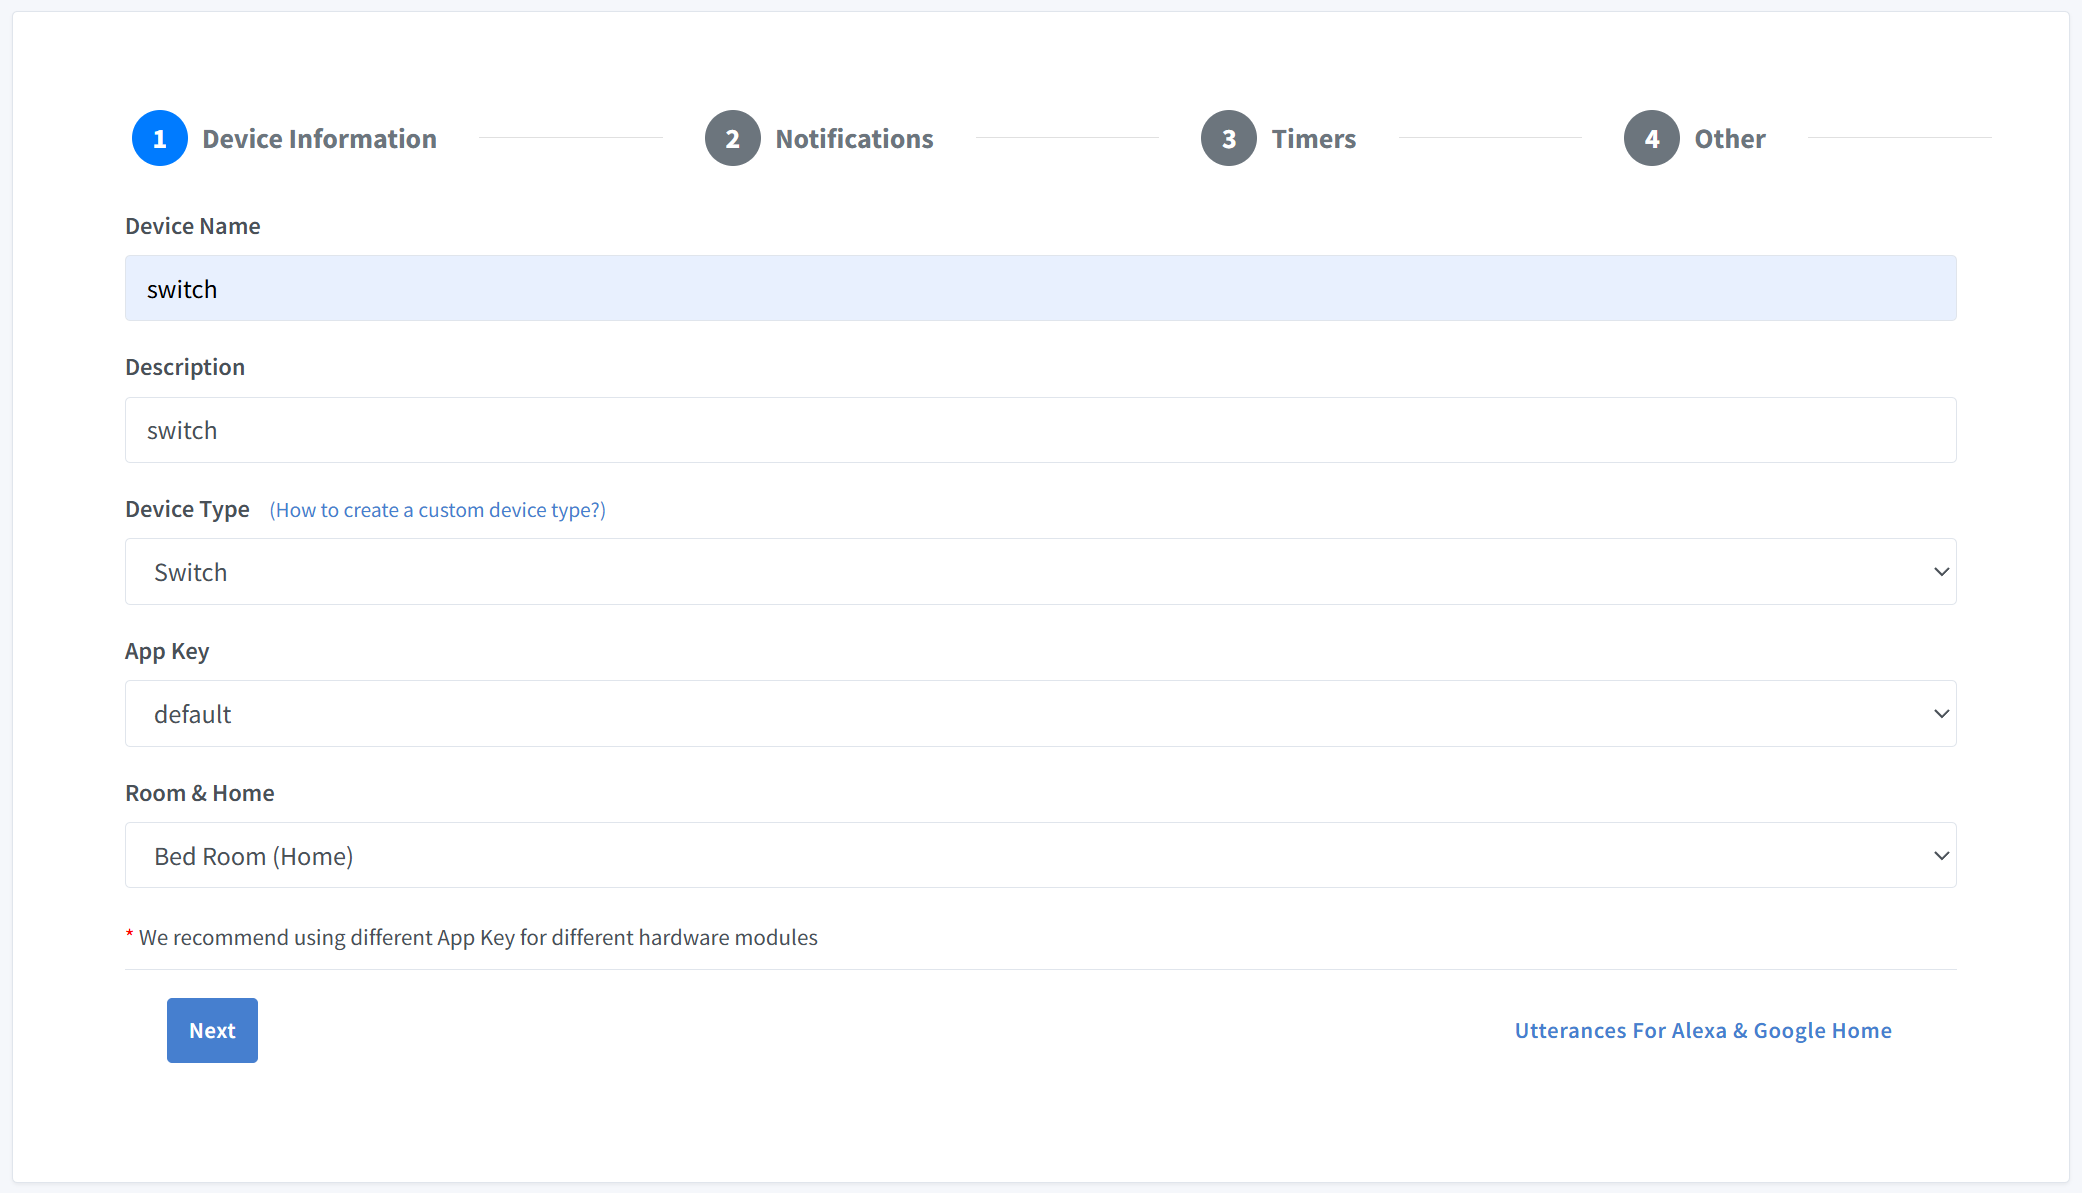
The first step in creating a new device involves configuring basic information about your device.
Fields
- Device Name
- Enter a unique name for your device. This name will be used to identify the device within your home automation system.
- Example: “Bedroom Light”
- Description
- Provide a brief description of the device’s purpose or functionality.
- Example: “Main light in the bedroom”
- Device Type
- Select the appropriate type of device from the dropdown menu:
- Switch
- Dimmable Switch
- Light
- TV
- Speaker
- Thermostat
- Fan
- Lock
- Doorbell
- Temperature Sensor
- Motion Sensor
- Contact Sensor
- Windows Air Conditioner
- Blinds
- Garage Door
- Camera
- Custom Devices (Once you create a custom device in Device Template, it will appear under here)
- Note: Click on the link
(How to create a custom device type?)if you want to learn about how to create a custom device type.
- Select the appropriate type of device from the dropdown menu:
- App Key
- The App Key is your unique credential for authenticating your IoT device when it connects to the SinricPro platform. It acts as a distinct identifier for your specific hardware module within the SinricPro ecosystem. To ensure proper functionality and avoid conflicts, select an App Key that directly corresponds to your hardware module, and use a different key for each module. Upon signing up for an account, a default App Key is automatically generated for you.
- Room & Home
- Assign the device to a specific room and home from the dropdown list.
- Example: “Bed Room (Home)”
Step 2: Notifications
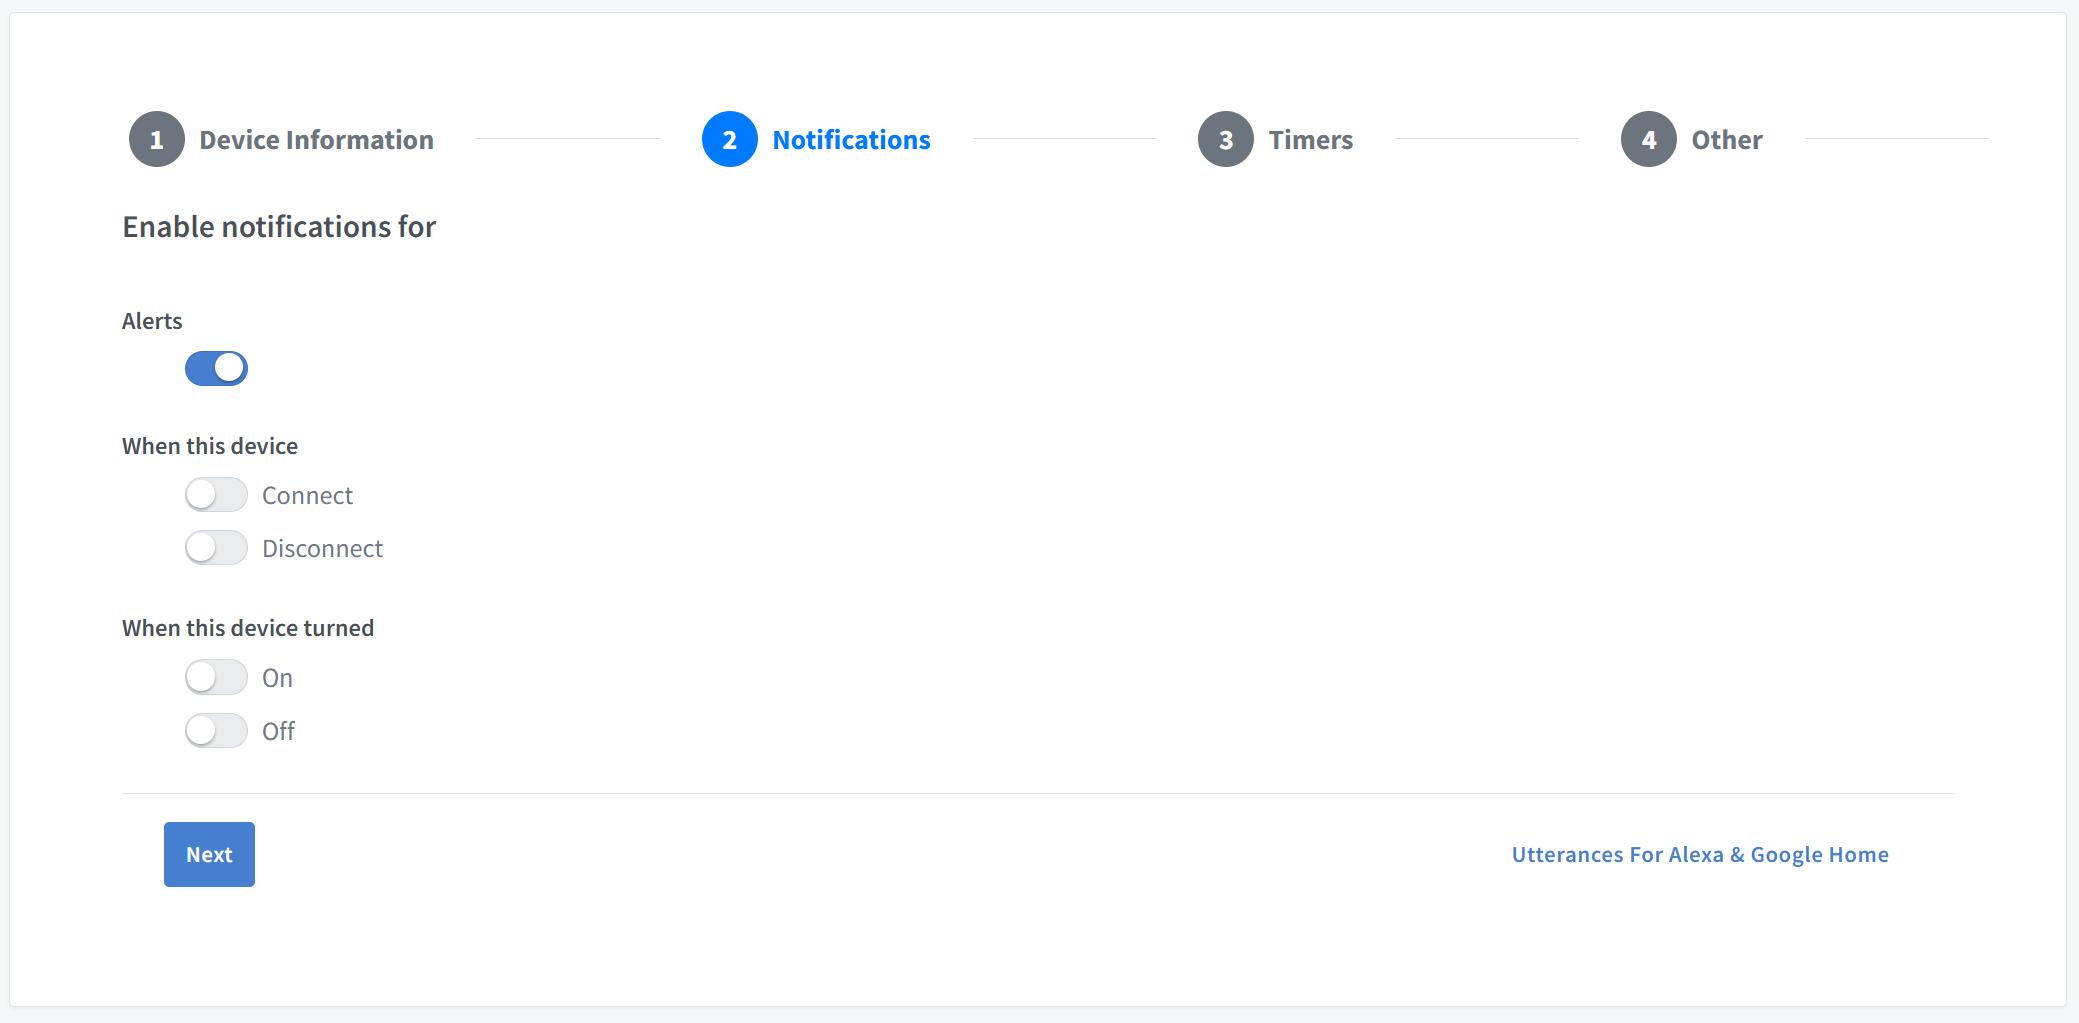
Configure which events trigger notifications for your device.
Enable Notifications
- Alerts: This toggle act as a global switch to enable and disable to allow push notifications to be send from this device to SinricPro app. (eg:
mySwitch.sendPushNotification("Hello SinricPro!")).
Event-Based Notifications
You can choose to receive notifications when certain device state changes occur:
| Notification Type | Description |
|---|---|
| Connect | Notify when the device connects to the cloud. |
| Disconnect | Notify when the device disconnects. |
| On | Notify when the device turns on. |
| Off | Notify when the device turns off. |
| Lock | Notify when the lock changed to lock |
| Unlock | Notify when the lock changed to unlock |
| Unlock | Notify when the lock changed to unlock |
| PM2.5 Air Quality | Notify when Air Quality Rises above μg/m3 threshold |
| PM2.5 Air Quality | Notify when Air Quality Falls falls below μg/m3 threshold |
| Motion | Notify when a motion is detected (Daytime or Nightime) |
| Camera Motion | Notify when motion picture is taken |
| Camera Snapshot | Notify when snapshot taken and describe what is in the snapshot using AI |
| Doorbell | Notify when doorbell pressed |
| Open | Notify when open (Garage Door or Contact Sensor or Blinds) |
| Closed | Notify when closed (Garage Door or Contact Sensor) |
| Temperature | Notify when temperature rises above threshold |
| Temperature | Notify when temperature falls below threshold |
What’s Retrigger Time ?
It’s the delay between one notification to another. It’s used to stop sending continuous push notification.
Tip: Use these options to monitor device status and receive real-time update notifications via the SinricPro app or connected platforms.
Step 3: Timers
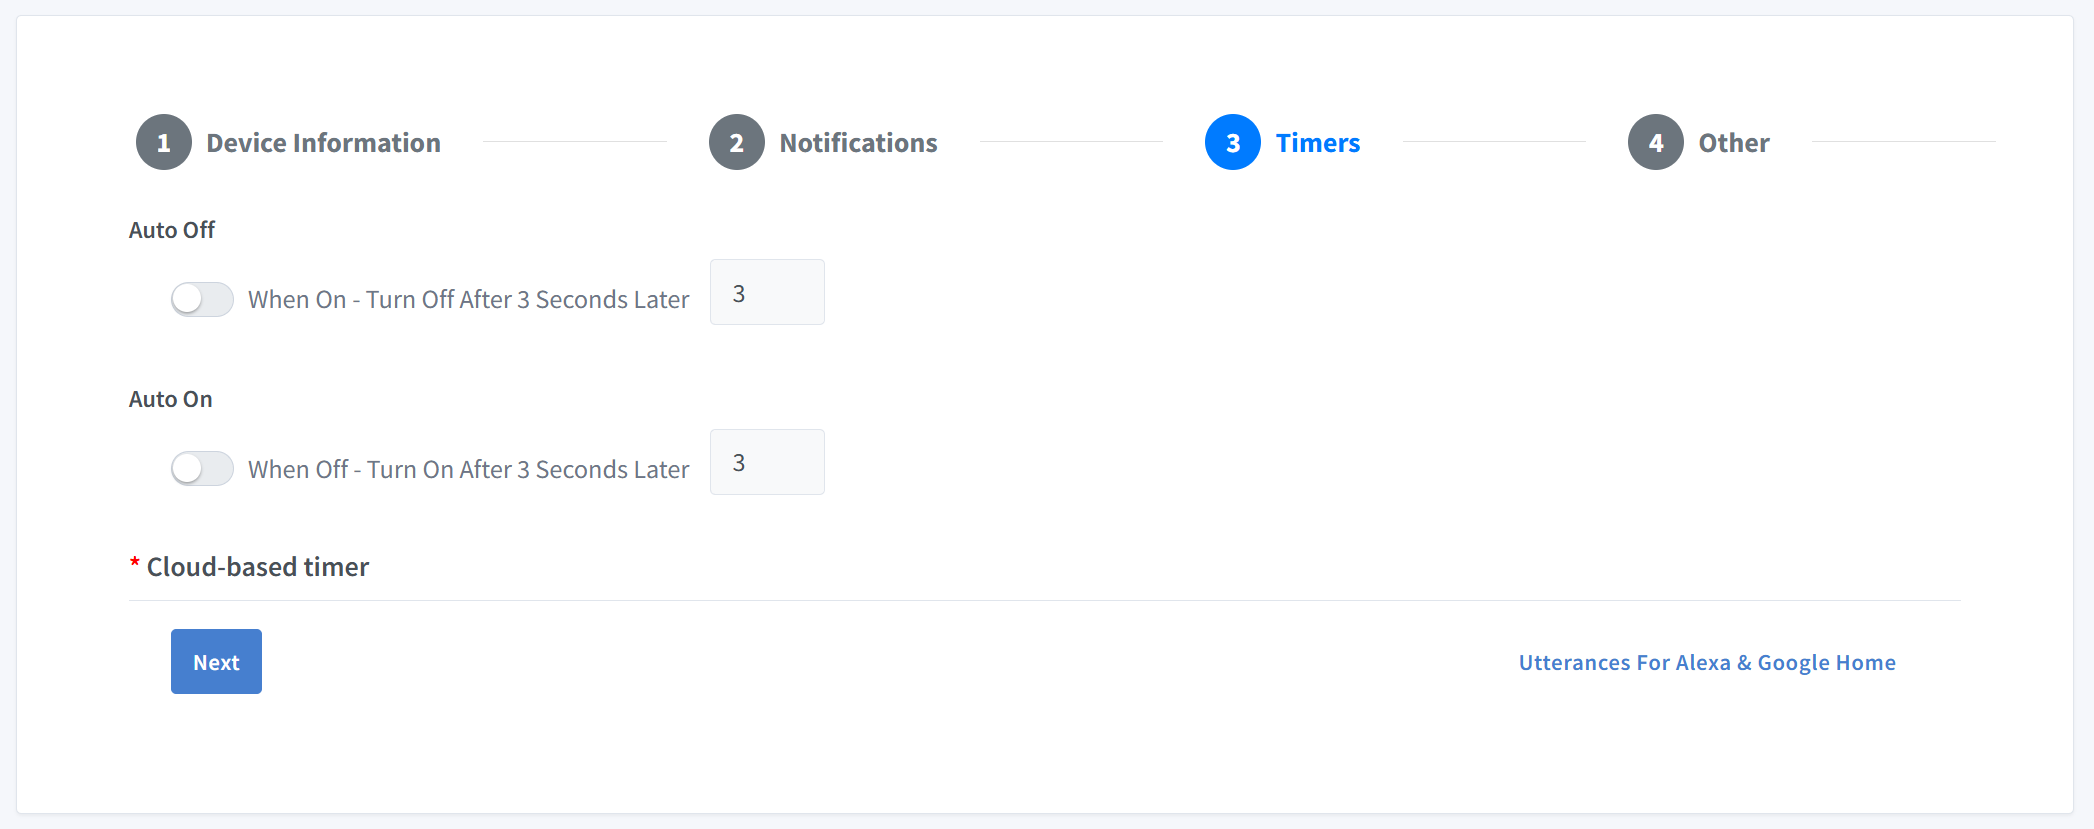
Set up automatic on/off behaviors for your device using cloud-managed timers. Minimum delay is 3 seconds. Ma interval cannot be more than 1 day.
Auto Off
- Enable: Toggle to activate auto-off.
- Delay: Set the number of seconds after which the device turns off automatically once turned on.
- Default:
3 seconds(adjustable) - Example: Set to
5→ device turns off 5 seconds after being turned on.
- Default:
Auto On
- Enable: Toggle to activate auto-on.
- Delay: Set the number of seconds after which the device turns on automatically once turned off.
- Default:
3 seconds(adjustable) - Example: Set to
10→ device turns on 10 seconds after being turned off.
- Default:
Note: Timers are cloud-based — they won’t work if the device is temporarily offline.
Use Cases:
- Blinking lights or strobe effects.
- Safety shutoff for heaters or motors.
Step 4: Other
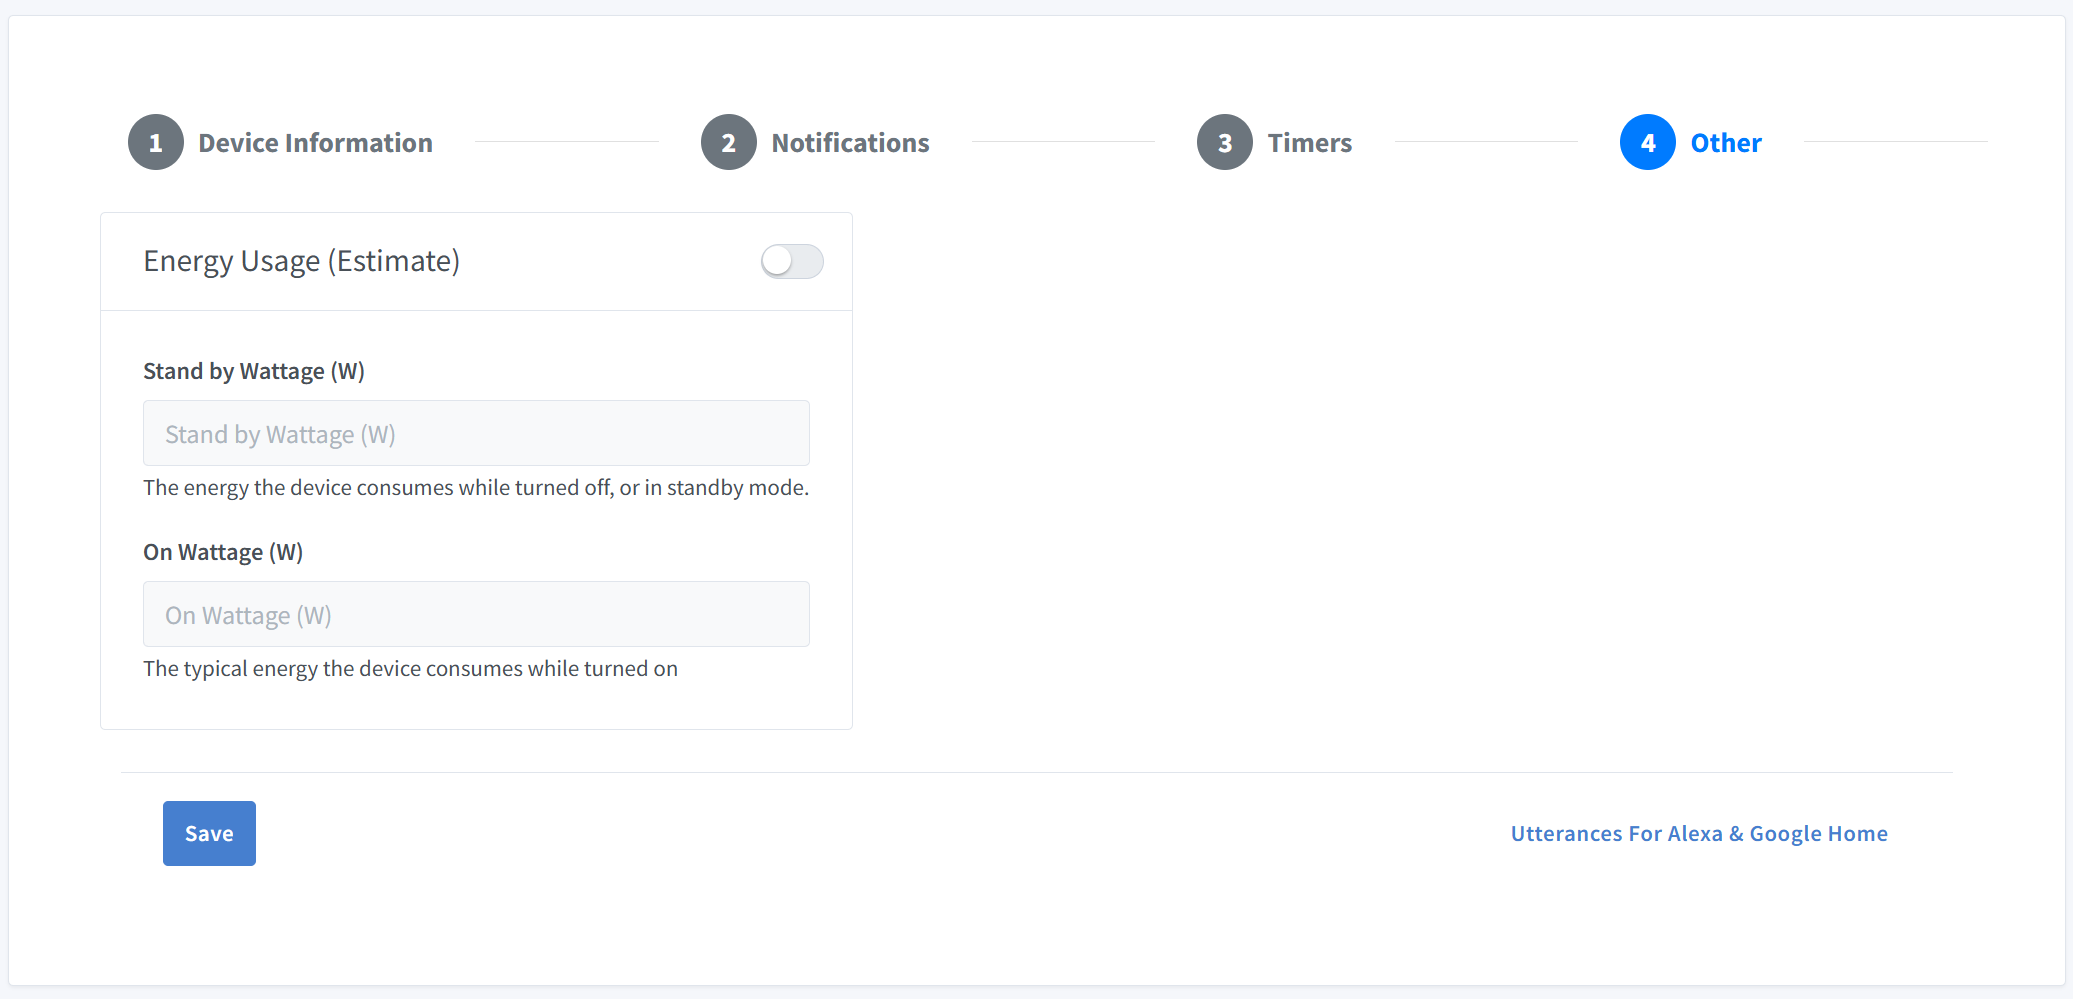
Provide optional metadata about your device, especially energy consumption.
Energy Usage (Estimate)
Toggle this option to enable energy estimation features. Server calculates the device’s energy consumption based on on/off timing of the device. You can view the consumption in the Energy Estimates menu on Portal.
Fields:
- Stand by Wattage (W)
Power consumed when the device is off or in standby.Example: Smart plug =
0.5W, TV =5W - On Wattage (W)
Power consumed when the device is actively running.Example: LED bulb =
9W, Fan =50W
Why It Matters:
Energy data helps users estimate electricity costs via Alexa smart dashboards.
Recommendation:
Use manufacturer specs or a watt-meter for accurate values.
Restore Device State When Connect
When this feature is enabled, the SinricPro server automatically sends the device’s most recent state—such as power status, brightness, custom settings, and other relevant data—immediately after the device reconnects.
For example, if your device was on when it went offline, the server will send that last known power state (true) to the device upon reconnection—triggering your onPowerState callback and automatically restoring the device to its previous state.
Custom Settings in SinricPro
Custom Settings allow you to define and manage your own device specific configuration parameters beyond the standard capabilities provided by SinricPro.
For example, you could use Custom Settings to:
- Enable or disable a built-in LED on or off,
- Set minimum SSID strength to connect to a SSID,
- Set a temperature offset for a thermostat,
- Flag to set automatic reboot after a firmware update,
- Configure a default brightness level for startup.
This document is open source. See a typo? Please create an issue