RaspberryPI WebRTC Camera for Alexa, Google Home
In this section, we will show you how to create a Sinric Pro Camera and view the camera feed on
- Alexa Echo Show
- Alexa App
- Google Nest Smart Display, and Chromecast with Google TV devices.
- Sinric Pro App and Portal.
Prerequisites :
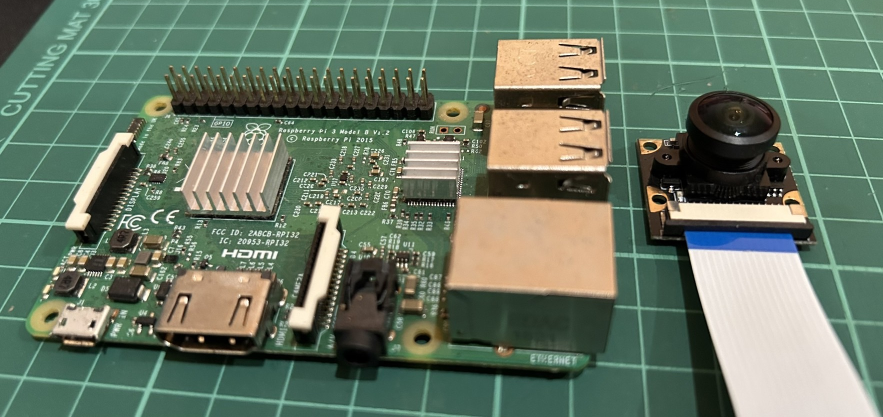
- Raspberry Pi x 1 (bullseye or newer).
- Camera controller x 1.
What is WebRTC?
WebRTC (Web Real-Time Communication) is a technology that enables real-time audio and video communication over the internet without the need for plugins or downloads. It is supported by all major browsers, apps and Smart Home devices like Amazon Eco Show, Chrome Cast, Google Nest making it a powerful tool for building real-time communication applications. WebRTC works by using peer-to-peer communication to transmit audio and video data. This means that the video/audio is transmitted directly between the two devices involved in the communication, without going through Sinric Pro server. This reduces latency and improves performance, especially for applications that are used over long distances.
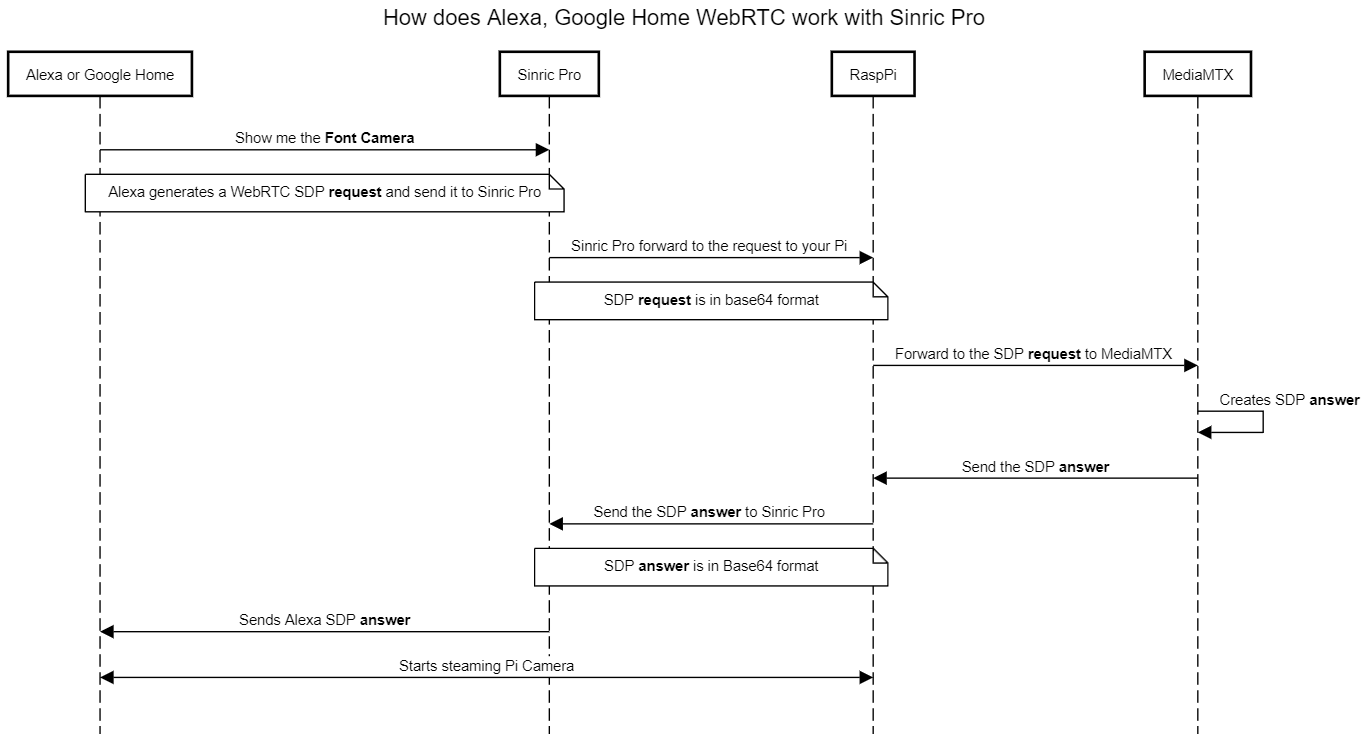
How does Alexa, Google Home WebRTC work with Sinric Pro ?
Step 1: Setup Raspberry Pi with the Camera Module
For instructions on setting up Raspberry Pi with the camera module, please see the excellent article from the Raspberry Pi Foundation here
Step 2: Setup MediaMTX (formerly rtsp-simple-server) to stream Pi Camera.
MediaMTX is a real-time media server that lets you stream video and audio over the network. It supports many streaming protocols, including RTSP, HLS, SRT, WebRTC, and RTMP. Because it supports the Raspberry Pi Camera natively, we can easily stream the Pi camera video over WebRTC using MediaMTX.
Let’s setup MediaMTX.
For arm64 Raspberry Pi:
pi@pi3:~/Desktop/tutorial $ wget https://github.com/bluenviron/mediamtx/releases/download/v0.23.3/mediamtx_v0.23.3_linux_amd64.tar.gz
pi@pi3:~/Desktop/tutorial $ tar -xzvf mediamtx_v0.23.3_linux_amd64.tar.gz
pi@pi3:~/Desktop/tutorial $ rm mediamtx_v0.23.3_linux_amd64.tar.gz
For arm64v8 Raspberry Pi:
pi@pi3:~/Desktop/tutorial $ wget https://github.com/bluenviron/mediamtx/releases/download/v0.23.3/mediamtx_v0.23.3_linux_arm64v8.tar.gz
pi@pi3:~/Desktop/tutorial $ tar -xzvf mediamtx_v0.23.3_linux_arm64v8.tar.gz
pi@pi3:~/Desktop/tutorial $ rm mediamtx_v0.23.3_linux_arm64v8.tar.gz
Once you extract you will see 3 files. mediamtx mediamtx.yml license
pi@pi3:~/Desktop/tutorial $ ls -l
total 36544
-rw-r--r-- 1 pi pi     1062 May 24 16:07 LICENSE
-rwxr-xr-x 1 pi pi 24859649 May 24 16:15 mediamtx
-rw-r--r-- 1 pi pi    19171 Sep 22 12:34 mediamtx.yml
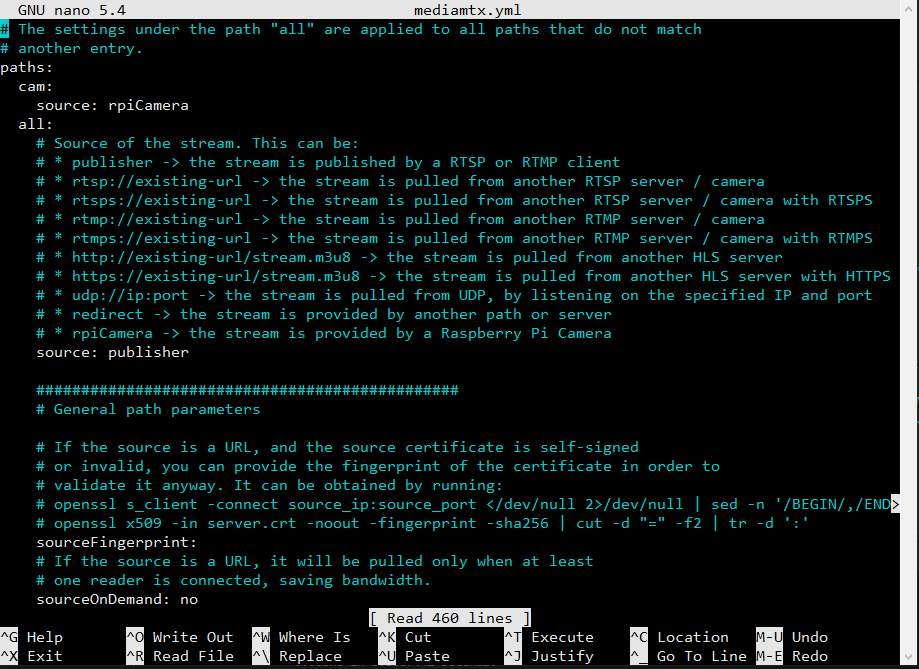
Edit mediamtx.yml to enable RaspberryPi Camera:
paths:
  cam:
    source: rpiCamera
Save mediamtx.yml and close.
Start MediaMTX with: ./mediamtx mediamtx.yml
pi@pi3:~/Desktop/tutorial $ ./mediamtx mediamtx.yml

2023/09/22 12:34:58 INF MediaMTX / rtsp-simple-server v0.23.3
2023/09/22 12:34:58 INF [path cam] [rpicamera source] started
2023/09/22 12:34:58 INF [RTSP] listener opened on :8554 (TCP), :8000 (UDP/RTP), :8001 (UDP/RTCP)
2023/09/22 12:34:58 INF [RTMP] listener opened on :1935
2023/09/22 12:34:58 INF [HLS] listener opened on :8888
2023/09/22 12:34:58 INF [WebRTC] listener opened on :8889 (HTTP)
[0:26:13.822982709] [1457]  INFO Camera camera_manager.cpp:299 libcamera v0.0.4+22-923f5d70
[0:26:13.887593667] [1458]  INFO RPI raspberrypi.cpp:1476 Registered camera /base/soc/i2c0mux/i2c@1/ov5647@36 to Unicam device /dev/media2 and ISP device /dev/media0
[0:26:13.889176990] [1457]  INFO Camera camera.cpp:1028 configuring streams: (0) 1920x1080-YUV420
[0:26:13.889745371] [1458]  INFO RPI raspberrypi.cpp:851 Sensor: /base/soc/i2c0mux/i2c@1/ov5647@36 - Selected sensor format: 1920x1080-SGBRG10_1X10 - Selected unicam format: 1920x1080-pGAA
2023/09/22 12:34:59 INF [path cam] [rpicamera source] ready: 1 track (H264)
The resulting RaspberryPI camera stream will be available in path http://hostname:8889/cam/. Please check whether you can access the camera. eg:
http://pi3:8889/cam/
Step 3: Sinric Pro Integration.
- Login to your Sinric Pro account, go to Devices menu on your left and click Add Device button (On top left).
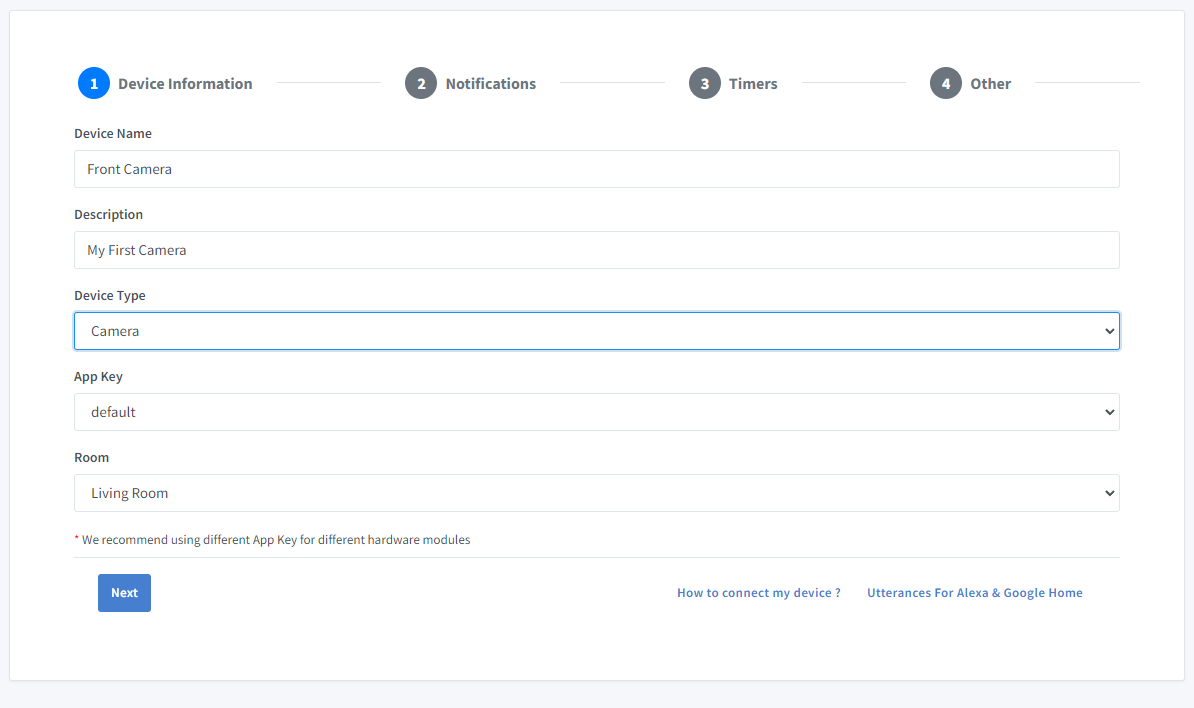
- Enter the device name Front Camera, description My First Camera and select the device type as Camera.
- Click Other tab
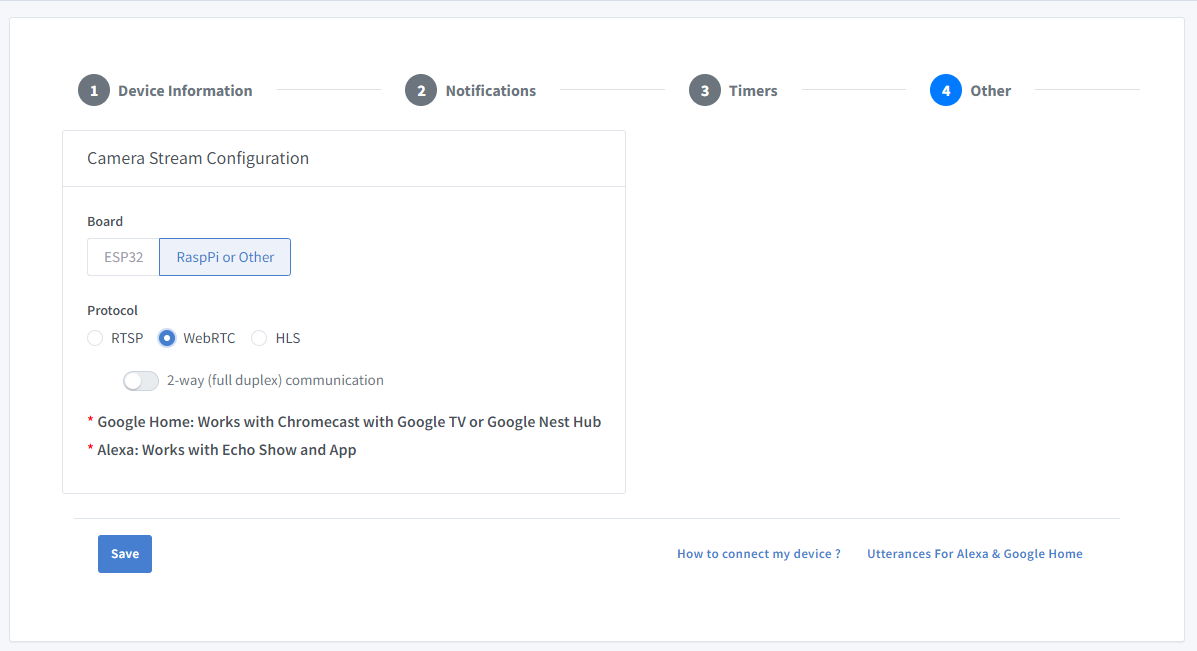
Select RaspPi or Other and select WebRTC as protocol
-
Click Others and Click Save
-
Next screen will show the credentials required to connect the device you just created.
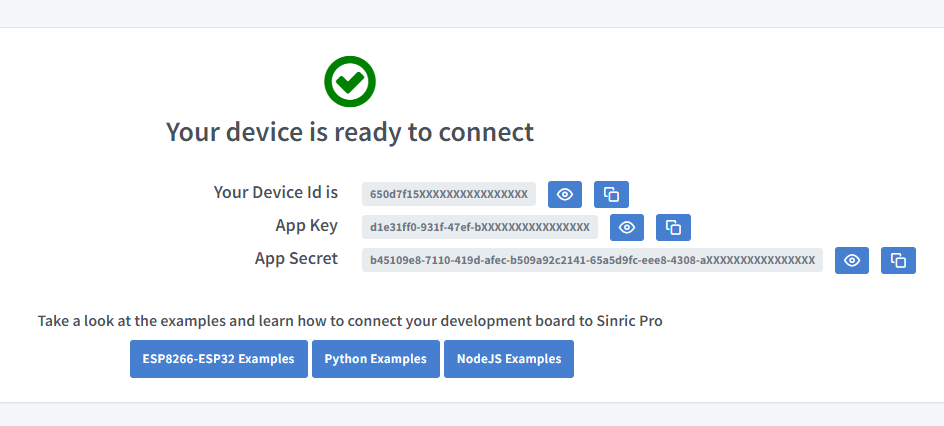
- Copy the Device Id, App Key and App Secret Keep these values secure. DO NOT SHARE THEM ON PUBLIC FORUMS !
Step 4: Coding
You can use the Python or NodeJS SDK to handle the SDP offer/answer requests between Alexa/Google Home and MediaMTX.
Install our PythonSDK:
pip install sinricpro --user
Install our NodeJS:
npm install sinricpro
Step 5: Demo
- Ask Alexa or Google Home to discover new devices.
- Alexa: Alexa, show me the Font Camera
- Google Home: Show me the Font Camera on Working Room TV (name of your Chromecast with Google TV)
Alexa Show Echo:
Portal:
Google Home Chromecast with Google TV:

Alexa App:
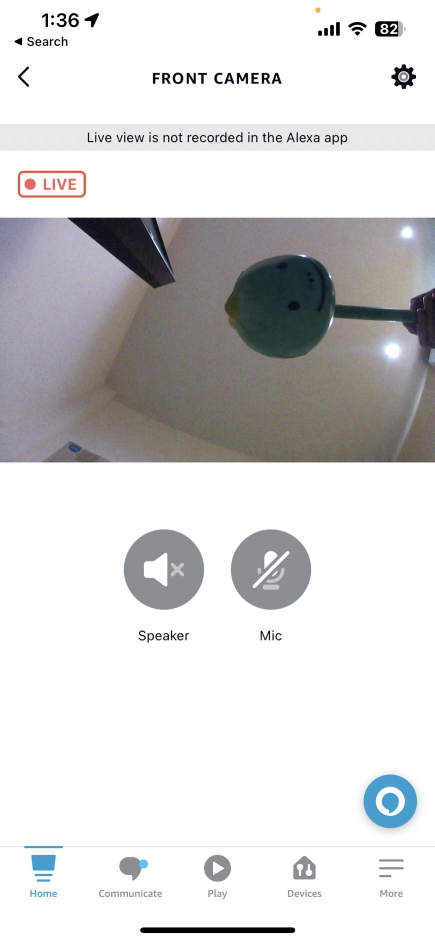
Sinric Pro App:
Troubleshooting
-
Google Home App Public beta camera preview does not work correctly.
-
Google Home WebRTC is currently supported on the Google Nest Smart Display and Chromecast with Google TV devices.
-
You can use Google WebRTC Tool to validate the payload. https://smarthome-webrtc-validator.withgoogle.com/
-
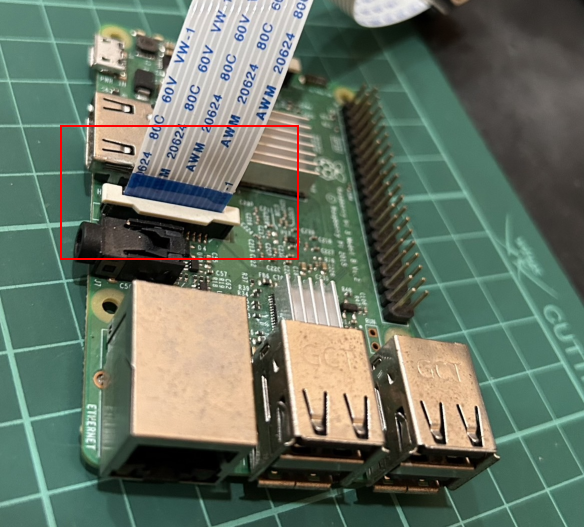
Camera does not work ?
Make sure it’s wired correctly.
Please refer to our Troubleshooting page for possible solutions to your issue.
This document is open source. See a typo? Please create an issue


