


Sensor de Temperatura LM35, LM335 e LM34 com ESP32 ou ESP8266 para Alexa
Nesta seção vamos criar um Sensor de Temperatura usando ESP32, ESP8266 e depois visualizar a temperatura via Alexa, Google Home ou SmartThings.
Pré-requisitos:
- ESP32, ESP8266 x 1.
- LM35, LM335 e LM34 x 1.
- Cabos Jumper.
Introdução rápida ao Sensor de Temperatura
Os sensores de temperatura LM35/LM34 são sensores de temperatura de circuito integrado linear que funcionam medindo a queda de tensão entre a base e o emissor de um transistor conectado como diodo. A queda de tensão entre a base e o emissor de um transistor conectado como diodo diminui a uma taxa conhecida à medida que a temperatura aumenta.
-
LM35 fornece medições de temperatura em Celsius (°C)
-
LM34 fornece medições de temperatura em Fahrenheit (ºF).
-
LM335 fornece medições de temperatura em Kelvin (ºK)
LM35 vs LM335 vs LM34: qual é a diferença?
Os três sensores fornecem uma tensão analógica que sobe 10 mV por grau. Eles diferem na escala de temperatura, na tensão de alimentação e na forma de ligação.
| LM35 | LM34 | LM335 | |
|---|---|---|---|
| Escala de saída | 10 mV por °C | 10 mV por °F | 10 mV por K |
| Saída a 25 °C (77 °F) | 0,25 V | 0,77 V | 2,98 V |
| Tipo de sensor | Saída de tensão, 3 pinos | Saída de tensão, 3 pinos | 2 terminais (tipo zener) com pino de ajuste |
| Alimentação | 4 V a 30 V | 5 V a 30 V | Corrente de polarização por um resistor |
| Componentes extras | Nenhum | Nenhum | Resistor de pull-up (polarização) |
| Calibração | Ajustado de fábrica | Ajustado de fábrica | Pode ser ajustado pelo pino ADJ |
Qual devo usar?
- LM35: a escolha mais simples se você quer Celsius. A leitura é a saída em milivolts dividida por 10.
- LM34: o mesmo sensor para Fahrenheit. Use-o se quiser °F sem conversão.
- LM335: a saída é em Kelvin, então subtraia 273,15 para obter Celsius. Ele precisa de um resistor de pull-up, e a saída fica em torno de 3 V à temperatura ambiente, por isso exige uma faixa de ADC maior que a do LM35.
O LM35 e o LM34 precisam de pelo menos 4 V e 5 V, então alimente-os pelo pino 5V / VIN, e não pelo 3.3V.
Pinagem do LM35, LM34 e LM335
Segure o encapsulamento TO-92 com o lado plano voltado para você e os terminais para baixo. Da esquerda para a direita:
| Sensor | Pino 1 (esquerda) | Pino 2 (meio) | Pino 3 (direita) |
|---|---|---|---|
| LM35 | +Vs (alimentação) | Vout | GND |
| LM34 | +Vs (alimentação) | Vout | GND |
| LM335 | ADJ (deixe desconectado) | + (saída) | − (GND) |
Fiação para LM35 ou LM34 com ESP8266
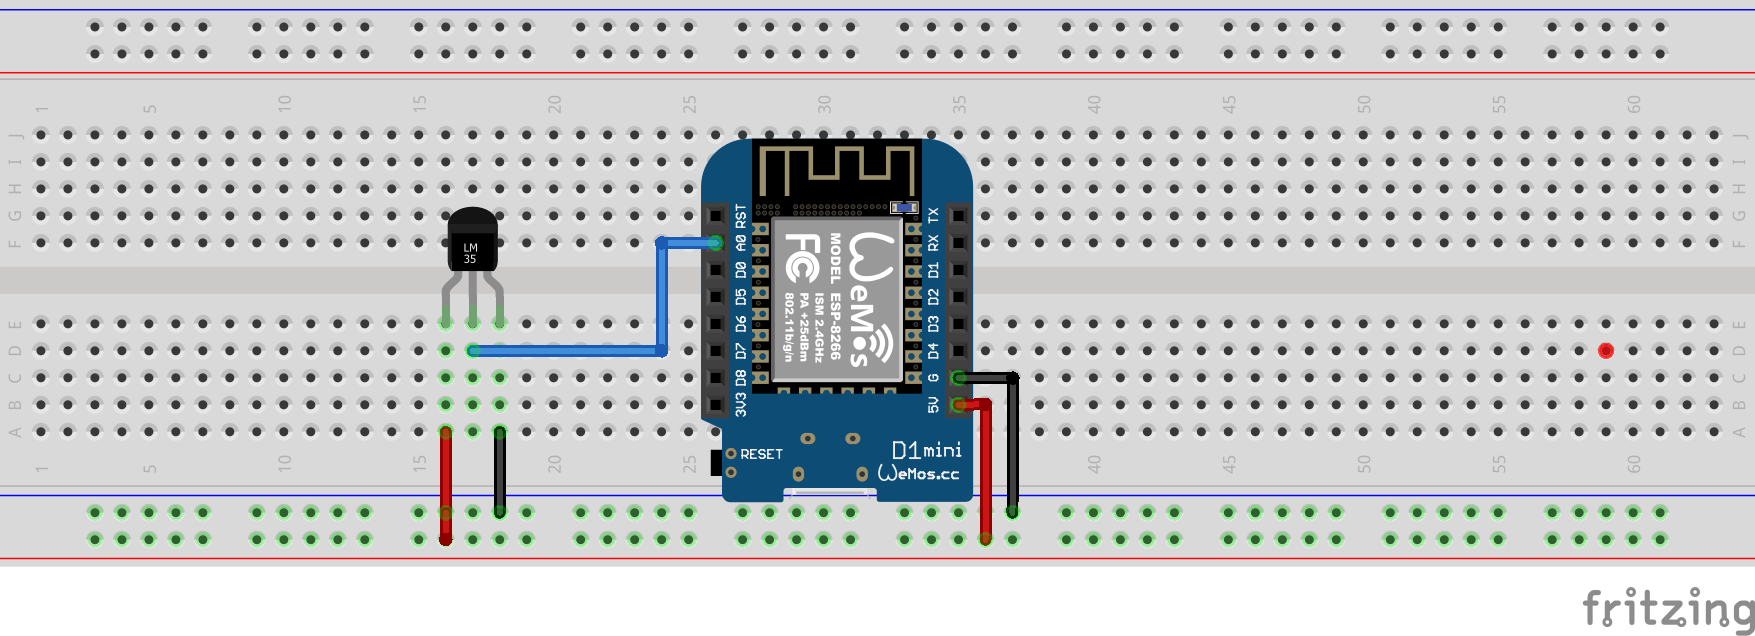
Fiação para LM335 com ESP8266
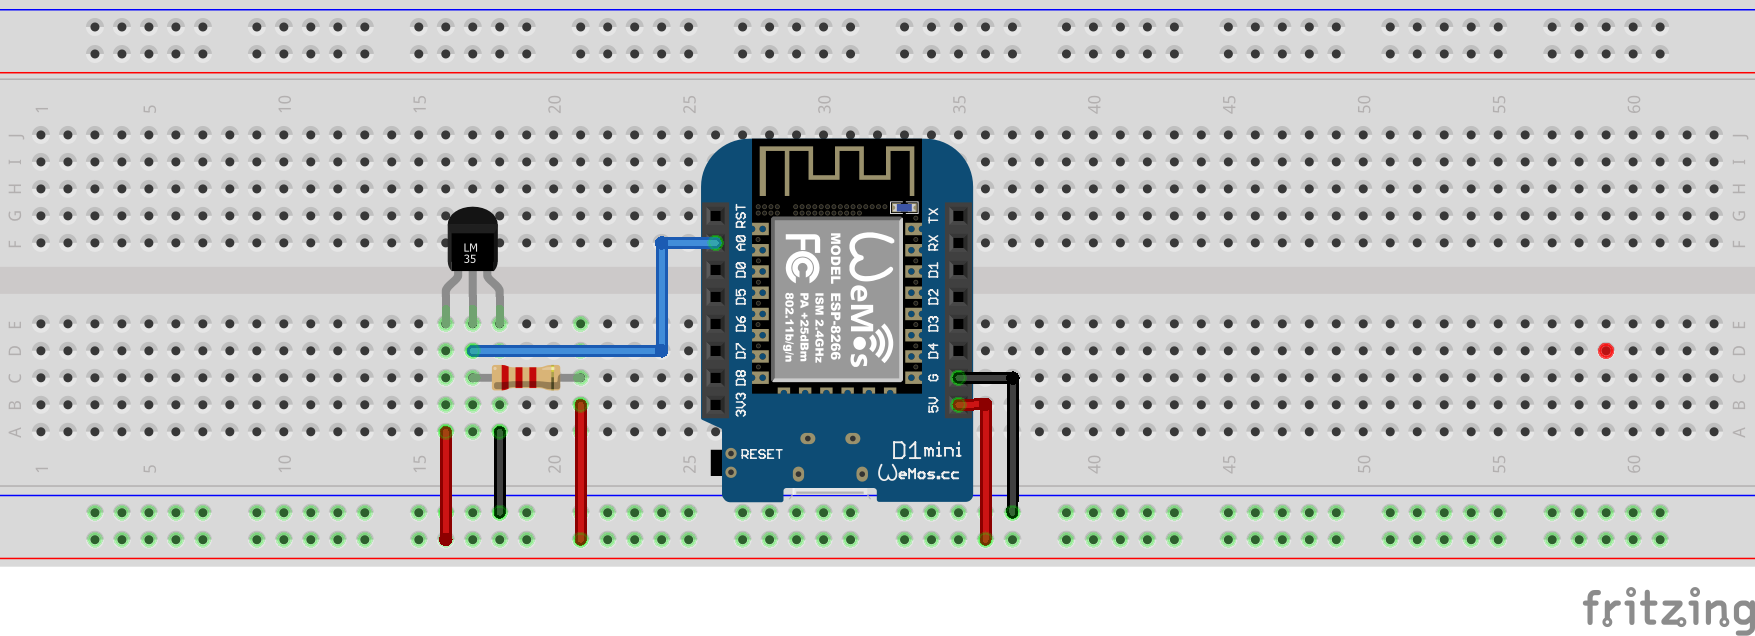
Pull-up via resistor de 2.2k Ohm
| MCU | Pino GPIO |
|---|---|
| ESP32 | 36 (ADC0) |
| ESP8266 | A0 (ADC0) |
Vamos verificar se a temperatura está conectada corretamente e funcionando.
#if defined(ESP8266)
  #define LM_PIN    A0
#elif defined(ESP32)
  #define LM_PIN    36
#endif

#define ADC_VREF_mV    5000.0 // 5000 is the voltage provided by MCU. If you connect to 3V change to 3000
#define ADC_RESOLUTION 4096.0

void setup() {
  Serial.begin(9600);
}

float getTemperature() {
  #if defined(ESP8266)
    int analogValue = analogRead(LM_PIN);
    float millivolts = (analogValue / 1024.0) * ADC_VREF_mV;
    float temperature = millivolts / 10;
    // float fahrenheit = ((temperature * 9) / 5 + 32);
    return temperature;
  #elif defined(ESP32)
    int adcVal = analogRead(LM_PIN);
    float milliVolt = adcVal * (ADC_VREF_mV / ADC_RESOLUTION);
    float temperature = milliVolt / 10;
    return temperature;
  #endif
}

void loop()
{
  float temperature = getTemperature();
  Serial.printf("Temperature: %2.1f °C\r\n", temperature);
  delay(1000);
}
Passo 1: Criar um novo dispositivo no Sinric Pro
- Faça login na sua conta Sinric Pro, vá ao menu Dispositivos à esquerda e clique no botão Adicionar Dispositivo (no canto superior esquerdo).
- Digite o nome do dispositivo Sensor de Temperatura, descrição Meu Sensor de Temperatura e selecione o tipo de dispositivo como Temperature Sensor.
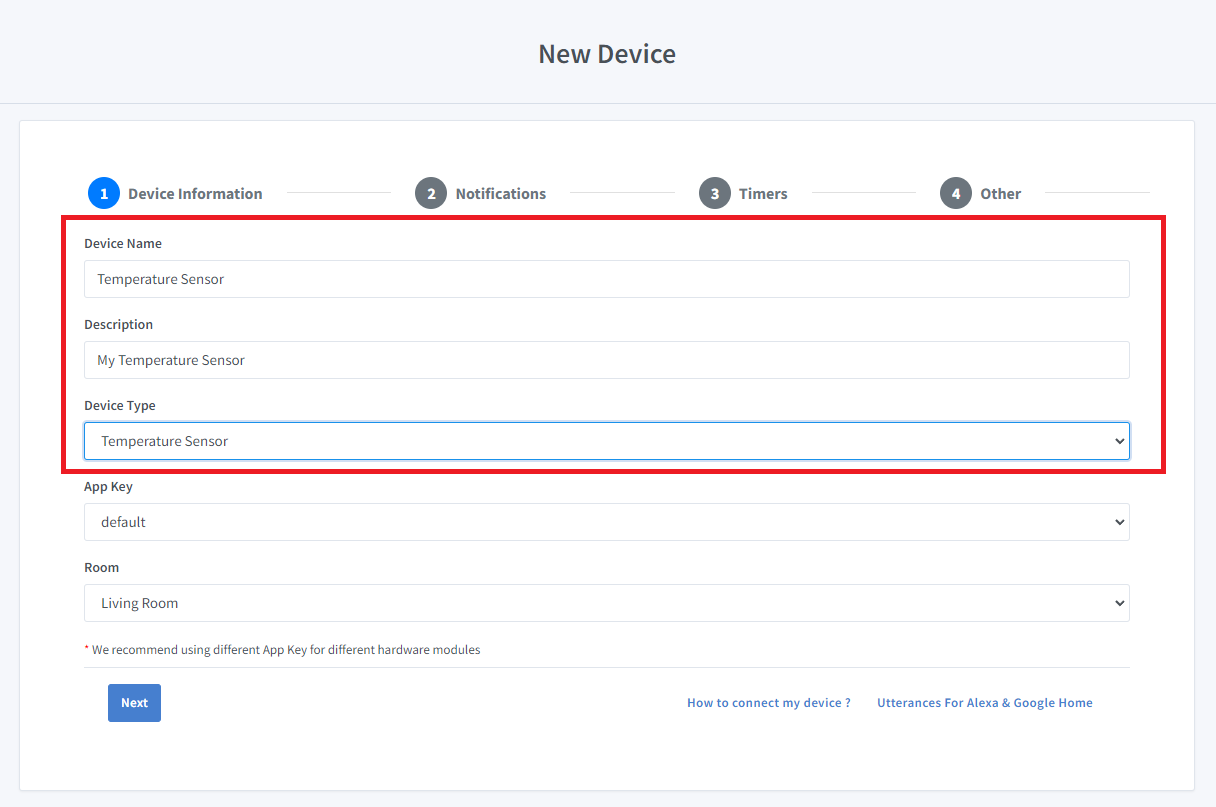
- Clique em Próximo na aba Notificações
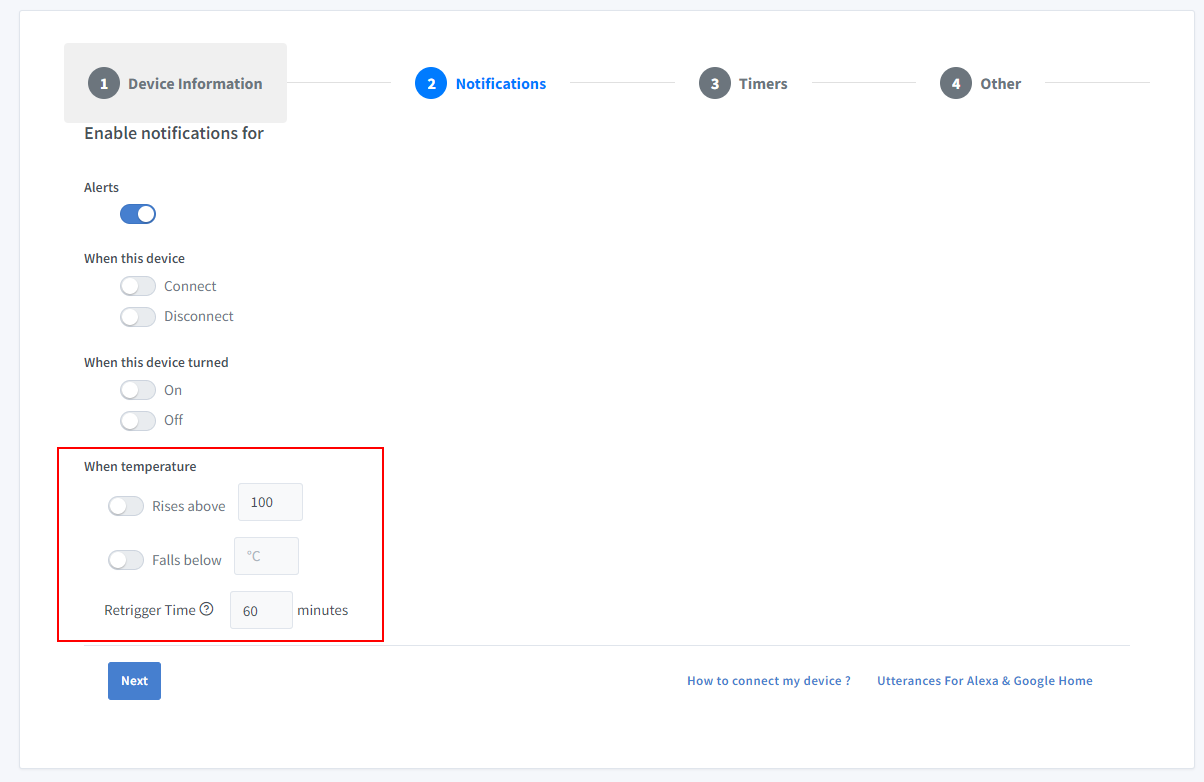
Você pode definir o limite aqui para receber uma notificação push via aplicativo Sinric Pro quando a temperatura ficar abaixo ou acima de uma certa temperatura. Use o Tempo de Re-disparo para definir o atraso entre notificações.
-
Clique na aba Outros e Clique em Salvar
-
A próxima tela mostrará as credenciais necessárias para conectar o dispositivo que você acabou de criar.
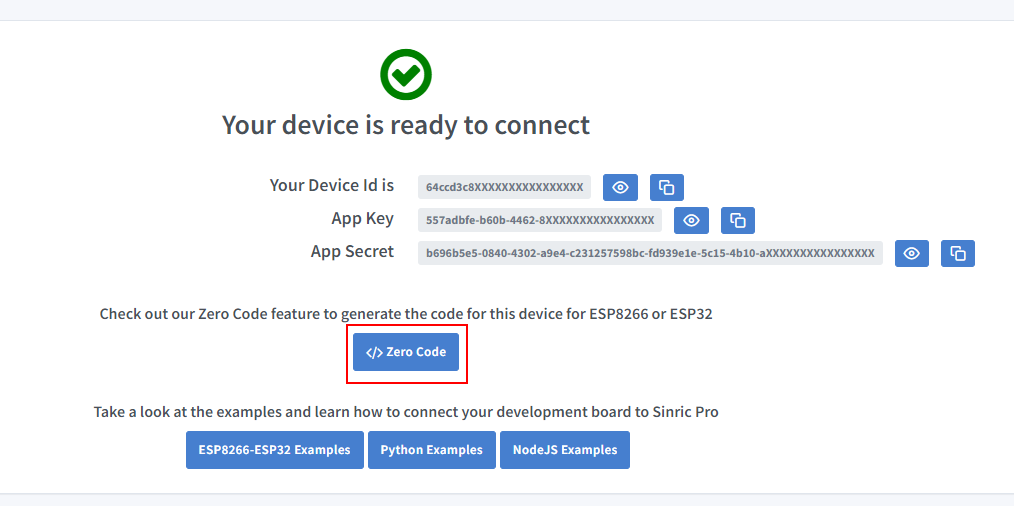
- Copie o ID do Dispositivo, Chave do App e Segredo do App Mantenha esses valores seguros. NÃO OS COMPARTILHE EM FÓRUNS PÚBLICOS!
Passo 2: Conectar ao Sinric Pro
Passo 2.1 Instalar a Biblioteca Sinric Pro

Você pode gerar o código usando o recurso Zero Code ou escrevê-lo você mesmo. Se você não tem experiência em programação, recomendamos usar o recurso Zero Code no Portal para gerar o código, baixar e carregar.
2.2 Código Completo
#ifdef ENABLE_DEBUG
  #define DEBUG_ESP_PORT Serial
  #define NODEBUG_WEBSOCKETS
  #define NDEBUG
#endif

#include <Arduino.h>
#if defined(ESP8266)
  #include <ESP8266WiFi.h>
#elif defined(ESP32)
  #include <WiFi.h>
#endif

#if defined(ESP8266)
  #define LM_PIN    A0
#elif defined(ESP32)
  #define LM_PIN    36
#endif


#include "SinricPro.h"
#include "SinricProTemperaturesensor.h"

#define WIFI_SSID         ""   // Your WiFI SSID name
#define WIFI_PASS         ""   // Your WiFi Password.
#define APP_KEY           ""   // Should look like "de0bxxxx-1x3x-4x3x-ax2x-5dabxxxxxxxx" (Get it from Portal -> Secrets)
#define APP_SECRET        ""   // Should look like "5f36xxxx-x3x7-4x3x-xexe-e86724a9xxxx-4c4axxxx-3x3x-x5xe-x9x3-333d65xxxxxx" (Get it from Portal -> Secrets)
#define TEMP_SENSOR_ID    ""   // Should look like "5dc1564130xxxxxxxxxxxxxx" (Get it from Portal -> Devices)
#define BAUD_RATE         115200              // Change baudrate to your need (used for serial monitor)
#define EVENT_WAIT_TIME   60000               // send event every 60 seconds

float temperature;                            // actual temperature
float humidity;                               // actual humidity
float lastTemperature;                        // last known temperature (for compare)

#define ADC_VREF_mV    5000.0 // 5000 is the voltage provided by MCU. If you connect to 3V change to 3000
#define ADC_RESOLUTION 4096.0

float getTemperature() {
  #if defined(ESP8266)
    int analogValue = analogRead(LM_PIN);
    float millivolts = (analogValue / 1024.0) * ADC_VREF_mV;
    float temperature = millivolts / 10;
    // float fahrenheit = ((temperature * 9) / 5 + 32);
    return temperature;
  #elif defined(ESP32)
    int adcVal = analogRead(LM_PIN);
    float milliVolt = adcVal * (ADC_VREF_mV / ADC_RESOLUTION);
    float temperature = milliVolt / 10;
    return temperature;
  #endif
}

void handleTemperaturesensor() {
  if (SinricPro.isConnected() == false) {
    Serial.printf("Not connected to Sinric Pro...!\r\n");
    return;
  }

  static unsigned long last_millis;
  unsigned long        current_millis = millis();
  if (last_millis && current_millis - last_millis < EVENT_WAIT_TIME) return;
  last_millis = current_millis;

  float temperature = getTemperature();

  Serial.printf("Temperature: %2.1f °C\r\n", temperature);

  if (isnan(temperature)) { // reading failed...
    Serial.printf("reading failed!\r\n");  // print error message
    return;                                    // try again next time
  }

  if (temperature == lastTemperature) {
    Serial.printf("Temperature did not changed. do nothing...!\r\n");
    return;
  }

  SinricProTemperaturesensor &mySensor = SinricPro[TEMP_SENSOR_ID];  // get temperaturesensor device
  bool success = mySensor.sendTemperatureEvent(temperature, -1); // send event
  if (success) {
    Serial.printf("Sent!\r\n");
  } else {
    Serial.printf("Something went wrong...could not send Event to server!\r\n"); // Enable ENABLE_DEBUG to see why
  }

  lastTemperature = temperature;  // save actual temperature for next compare
}


// setup function for WiFi connection
void setupWiFi() {
  Serial.printf("\r\n[Wifi]: Connecting");

  #if defined(ESP8266)
    WiFi.setSleepMode(WIFI_NONE_SLEEP);
    WiFi.setAutoReconnect(true);
  #elif defined(ESP32)
    WiFi.setSleep(false);
    WiFi.setAutoReconnect(true);
  #endif

  WiFi.begin(WIFI_SSID, WIFI_PASS);

  while (WiFi.status() != WL_CONNECTED) {
    Serial.printf(".");
    delay(250);
  }
  IPAddress localIP = WiFi.localIP();
  Serial.printf("connected!\r\n[WiFi]: IP-Address is %d.%d.%d.%d\r\n", localIP[0], localIP[1], localIP[2], localIP[3]);
}

bool onPowerState(const String &deviceId, bool &state) {
  return true; // request handled properly
}

// setup function for SinricPro
void setupSinricPro() {
  // add device to SinricPro
  SinricProTemperaturesensor &mySensor = SinricPro[TEMP_SENSOR_ID];
  mySensor.onPowerState(onPowerState);

  // setup SinricPro
  SinricPro.onConnected([](){ Serial.printf("Connected to SinricPro\r\n"); });
  SinricPro.onDisconnected([](){ Serial.printf("Disconnected from SinricPro\r\n"); });
  //SinricPro.restoreDeviceStates(true); // Uncomment to restore the last known state from the server.
  SinricPro.begin(APP_KEY, APP_SECRET);
}

// main setup function
void setup() {
  Serial.begin(BAUD_RATE); Serial.printf("\r\n\r\n");

  setupWiFi();
  setupSinricPro();
}

void loop() {
  SinricPro.handle();
  handleTemperaturesensor();
}
Agora você deve conseguir visualizar a temperatura via App Sinric Pro
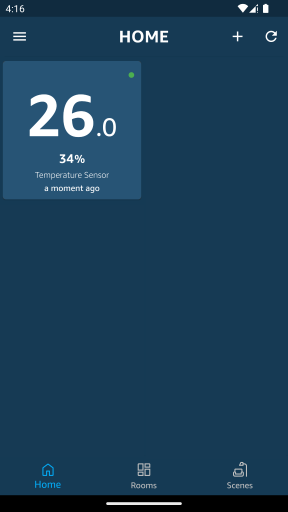
Note que o aplicativo Google Home mostra o sensor de temperatura como um Termostato devido às limitações do Google Home.
Solução de Problemas
- Consulte nossa página de Solução de Problemas para mais detalhes.
Este documento é código aberto. Viu um erro de digitação? Por favor, crie uma issue