Local WiFI OTA Update via ArduinoOTA
Over-the-air (OTA) updates offer a convenient and efficient way to update your modules using WiFi connection without physically connecting it to your computer. In order to upload firmware, you have to update your Sinric Pro integration with ArduinoOTA support code.
Below example demonstrates how to use Switch sketch with ArduinoOTA support.
// Uncomment the following line to enable serial debug output
//#define ENABLE_DEBUG

#ifdef ENABLE_DEBUG
  #define DEBUG_ESP_PORT Serial
  #define NODEBUG_WEBSOCKETS
  #define NDEBUG
#endif

#include <Arduino.h>
#include <ArduinoOTA.h>
#if defined(ESP8266)
  #include <ESP8266WiFi.h>
#elif defined(ESP32) || defined(ARDUINO_ARCH_RP2040)
  #include <WiFi.h>
#endif

#include "SinricPro.h"
#include "SinricProSwitch.h"

#define WIFI_SSID         "YOUR-WIFI-SSID"
#define WIFI_PASS         "YOUR-WIFI-PASSWORD"
#define APP_KEY           "YOUR-APP-KEY"      // Should look like "de0bxxxx-1x3x-4x3x-ax2x-5dabxxxxxxxx"
#define APP_SECRET        "YOUR-APP-SECRET"   // Should look like "5f36xxxx-x3x7-4x3x-xexe-e86724a9xxxx-4c4axxxx-3x3x-x5xe-x9x3-333d65xxxxxx"
#define SWITCH_ID         "YOUR-DEVICE-ID"    // Should look like "5dc1564130xxxxxxxxxxxxxx"
#define BAUD_RATE         115200                // Change baudrate to your need


bool onPowerState(const String &deviceId, bool &state) {
  Serial.printf("Device %s turned %s (via SinricPro) \r\n", deviceId.c_str(), state?"on":"off");
  return true; // request handled properly
}

// setup function for WiFi connection
void setupWiFi() {
  Serial.printf("\r\n[Wifi]: Connecting");

  #if defined(ESP8266)
    WiFi.setSleepMode(WIFI_NONE_SLEEP);
    WiFi.setAutoReconnect(true);
  #elif defined(ESP32)
    WiFi.setSleep(false);
    WiFi.setAutoReconnect(true);
  #endif

  WiFi.begin(WIFI_SSID, WIFI_PASS);

  while (WiFi.status() != WL_CONNECTED) {
    Serial.printf(".");
    delay(250);
  }
  Serial.printf("connected!\r\n[WiFi]: IP-Address is %s\r\n", WiFi.localIP().toString().c_str());
}

void setupOTA() {
  // Hostname defaults to esp3232-[MAC]
  ArduinoOTA.setHostname("SinricProOTATestDevice");

  // No authentication by default
  // ArduinoOTA.setPassword("admin");

  ArduinoOTA.onStart([]() {
    String type;
    if (ArduinoOTA.getCommand() == U_FLASH)
      type = "sketch";
    else // U_SPIFFS
      type = "filesystem";

    // NOTE: if updating SPIFFS this would be the place to unmount SPIFFS using SPIFFS.end()
    Serial.println("Start updating " + type);
  })
  .onEnd([]() {
    Serial.println("\nEnd");
  })
  .onProgress([](unsigned int progress, unsigned int total) {
    Serial.printf("Progress: %u%%\r", (progress / (total / 100)));
  })
  .onError([](ota_error_t error) {
    Serial.printf("Error[%u]: ", error);
    if (error == OTA_AUTH_ERROR) Serial.println("Auth Failed");
    else if (error == OTA_BEGIN_ERROR) Serial.println("Begin Failed");
    else if (error == OTA_CONNECT_ERROR) Serial.println("Connect Failed");
    else if (error == OTA_RECEIVE_ERROR) Serial.println("Receive Failed");
    else if (error == OTA_END_ERROR) Serial.println("End Failed");
  });

  ArduinoOTA.begin();
  Serial.printf("\r\n[setupOTA]: Ready");
}

// setup function for SinricPro
void setupSinricPro() {
  // add device to SinricPro
  SinricProSwitch& mySwitch = SinricPro[SWITCH_ID];

  // set callback function to device
  mySwitch.onPowerState(onPowerState);

  // setup SinricPro
  SinricPro.onConnected([](){ Serial.printf("Connected to SinricPro\r\n"); });
  SinricPro.onDisconnected([](){ Serial.printf("Disconnected from SinricPro\r\n"); });
  SinricPro.begin(APP_KEY, APP_SECRET);
}

// main setup function
void setup() {
  Serial.begin(BAUD_RATE); Serial.printf("\r\n\r\n");
  setupWiFi();
  setupSinricPro();
  setupOTA();
}

void loop() {
  ArduinoOTA.handle();
  SinricPro.handle();
}
Once you flash above code, OTA server will start listening to OTA updates from Arduino IDE.

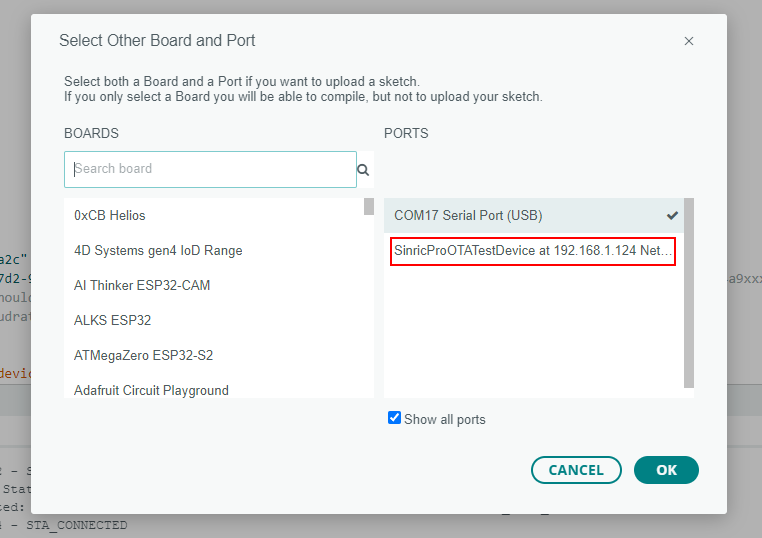
Next time, you can select the OTA host (SinricProOTATestDevice) instead of COM port.


