

Settings Tutorial
Custom Settings is a powerful feature that allows you to define and manage configuration parameters for your devices and modules. Instead of hardcoding values in your firmware, you can create settings that can be changed remotely through the SinricPro Portal or app.
SDK Requirements
To use the Settings feature, ensure you have the following SDK versions:
| SDK | Minimum Version |
|---|---|
| ESP8266/ESP32 SDK | 4.0 |
| Node.js SDK | 5.1.0 |
| Python SDK | 5.0.1 |
Note: These settings are not controllable via Amazon Alexa or Google Home.
The Settings feature enables you to:
- Define custom configuration parameters for your devices (e.g., temperature thresholds, timer durations, operating modes)
- Change device behavior remotely without re-flashing firmware
- Create reusable settings that can be assigned to multiple devices
- Organize settings by category for better management
Types of Settings
SinricPro supports three types of settings:
| Type | Description | Example Use Cases |
|---|---|---|
| Number | Numeric values with optional min/max range, precision, and units | Temperature threshold (0-100°C), Fan speed (0-100%), Timer duration (seconds) |
| List | Dropdown selection from predefined options | Operating mode (Off/Low/Medium/High), Power profile (Eco/Normal/Performance) |
| Boolean | Simple on/off toggle | Enable notifications, Debug mode, Night mode |
Settings can be created at two levels:
- Device Settings: Apply to individual IoT devices (e.g., a specific smart switch)
- Module Settings: Apply to ESP modules/controller boards (e.g., WiFi configuration for the module itself)
Setting Up Custom Settings
Step 1: Create a Global Setting

Global settings are reusable templates that can be assigned to multiple devices.
-
Navigate to Devices → Global Device Settings (for device settings) or Modules → Global Module Settings (for module settings)
-
Click Create New Setting
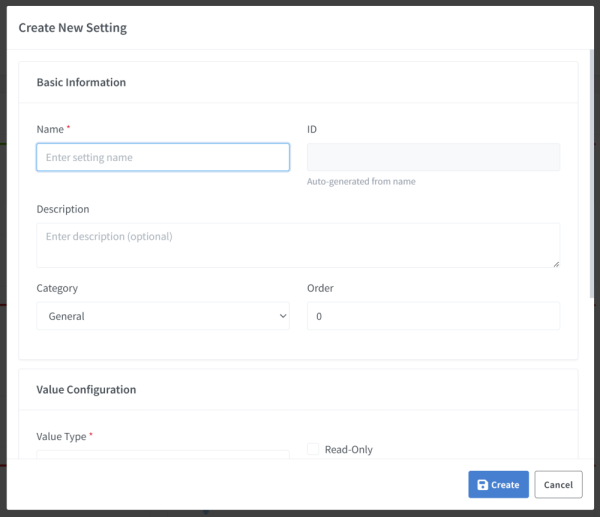
- Fill in the Basic Information:
- Name: A descriptive name (e.g., “Temperature Threshold”)
- Setting ID: Auto-generated from name (e.g.,
id_temperature_threshold) - Description: Optional explanation of what this setting does
- Category: Group your settings (General, Operation, Timer, Sensors, etc.)
- Order: Sort order for display (0 = first)
-
Configure the Value Type:
For Number Settings:
- Set minimum and maximum values
- Choose precision (decimal places: 0-4)
- Optionally specify a unit (°C, %, RPM, sec, etc.)
- Enable “Is Percentage” for 0-100% range with automatic formatting
For List Settings:
- Add 2-20 options
- Each option must be unique
- First option becomes the default
For Boolean Settings:
- No additional configuration needed
- Displays as Enabled/Disabled toggle
-
Optional: Enable Read-Only if the device sets this value and users should only view it (e.g., sensor readings)
- Click Create to save the setting
Step 2: Assign Settings to a Device
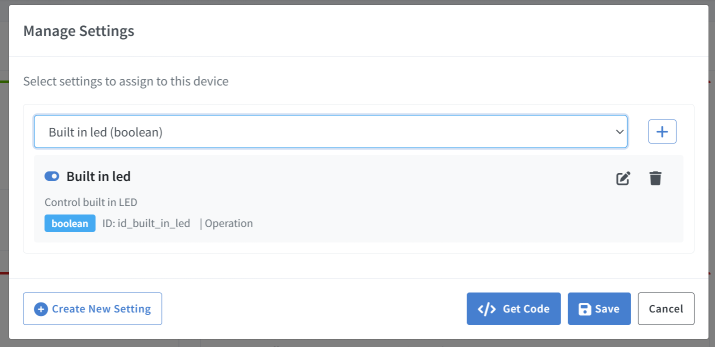
Once you’ve created global settings, assign them to your devices:
Option 1:
-
Go to Devices and select the device you want to configure, click Edit
-
Click on the Other tab
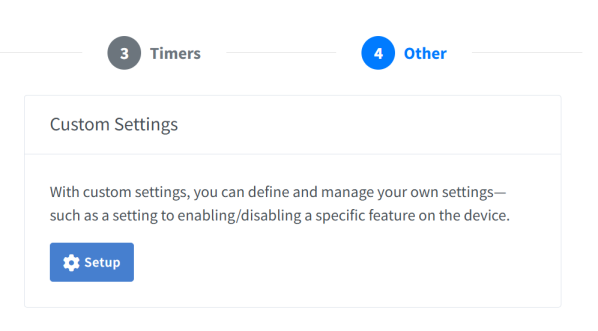
-
In Custom Settings, click Setup to open the settings assignment dialog
-
Click Select a setting dropdown and choose a setting to assign
-
To assign multiple settings, click +
- Review the settings you’ve selected - you can see:
- Setting name and ID
- Type (Number/List/Boolean)
- Category
- Read-only status
- Click Save to apply the settings to your device
Option 2:
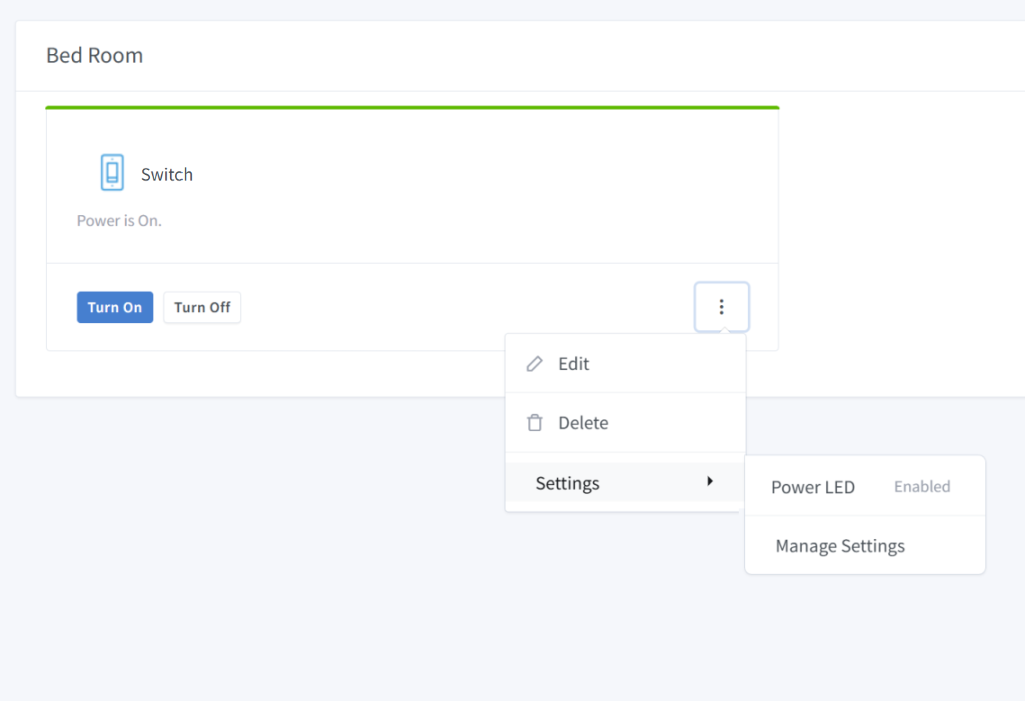
- Go to Dashboard and select the device you want to configure, click Settings

-
Click Manage Settings and Select a setting
-
On Select a setting dialog, choose a setting to assign
-
To assign multiple settings, click +
- Review the settings you’ve selected - you can see:
- Setting name and ID
- Type (Number/List/Boolean)
- Category
- Read-only status
- Click Save to apply the settings to your device
Step 3: Generate Code for Your Firmware
After assigning settings, generate the callback code for your firmware:
-
In the settings assignment dialog, click Get Code
- Select your SDK:
- Arduino ESP-8266/ESP-32/RP2040
- NodeJS
- Python
- Copy the generated code and integrate it into your firmware
Using Settings in Your Code
Arduino/ESP SDK
Device Settings Callback
bool onSetDeviceSetting(const String& deviceId, const String& settingId, SettingValue& settingValue) {
  // Handle device settings based on value type
  if (std::holds_alternative<int>(settingValue)) {
    Serial.printf("Device %s: Setting %s = %d\r\n", deviceId.c_str(), settingId.c_str(), std::get<int>(settingValue));
  } else if (std::holds_alternative<float>(settingValue)) {
    Serial.printf("Device %s: Setting %s = %.2f\r\n", deviceId.c_str(), settingId.c_str(), std::get<float>(settingValue));
  } else if (std::holds_alternative<bool>(settingValue)) {
    Serial.printf("Device %s: Setting %s = %s\r\n", deviceId.c_str(), settingId.c_str(), std::get<bool>(settingValue) ? "true" : "false");
  } else if (std::holds_alternative<String>(settingValue)) {
    Serial.printf("Device %s: Setting %s = %s\r\n", deviceId.c_str(), settingId.c_str(), std::get<String>(settingValue).c_str());
  }
  return true;
}

void setupSinricPro() {
  // ... your existing setup code ...

  // Register the device setting callback
  myDevice.onSetSetting(onSetDeviceSetting);
  // ..
  SinricPro.begin(APP_KEY, APP_SECRET);
}
Device Settings Event
void sendLedState() {
  SinricProSwitch& mySwitch = SinricPro[SWITCH_ID];
  Serial.printf("Sending device setting 'id_led' = %s\r\n", ledState ? "true" : "false");
  mySwitch.sendSettingEvent('id_led', ledState);
}
Module Settings Callback
bool onSetModuleSetting(const String& id, SettingValue& value) {
  // Handle module settings based on value type
  if (std::holds_alternative<int>(value)) {
    Serial.printf("Module setting %s = %d\r\n", id.c_str(), std::get<int>(value));
  } else if (std::holds_alternative<float>(value)) {
    Serial.printf("Module setting %s = %.2f\r\n", id.c_str(), std::get<float>(value));
  } else if (std::holds_alternative<bool>(value)) {
    Serial.printf("Module setting %s = %s\r\n", id.c_str(), std::get<bool>(value) ? "true" : "false");
  } else if (std::holds_alternative<String>(value)) {
    Serial.printf("Module setting %s = %s\r\n", id.c_str(), std::get<String>(value).c_str());
  }
  return true;
}

void setupSinricPro() {
  // ... your existing setup code ...

  // Register module setting callback
  SinricPro.onSetSetting(onSetModuleSetting);
  // ..
  SinricPro.begin(APP_KEY, APP_SECRET);
}
Module Settings Event
  int rssi = WiFi.RSSI();
  Serial.printf("Sending module setting 'id_wifi_rssi' = %d\r\n", rssi);
  SinricPro.sendSettingEvent('id_wifi_rssi', rssi);
NodeJS SDK
myDevice.onSetting(async (deviceId, setting, value) => {
  if (setting === "id_temperature_threshold") {
    console.log(`Device ${deviceId} setting: ${setting} = ${value}`);
    // Apply your logic
    await setTemperatureThreshold(value);
  } else if (setting === "id_power_mode") {
    console.log(`Device ${deviceId} setting: ${setting} = ${value}`);
    await setPowerMode(value);
  }

  return true;
});
Python SDK
async def on_setting(setting: str, value: Any) -> bool:
    if setting == "id_temperature_threshold":
        print(f"Setting {setting} = {value}")
        await set_temperature_threshold(value)
    elif setting == "id_power_mode":
        print(f"Setting {setting} = {value}")
        await set_power_mode(value)

    return True

# In main() function
my_device.on_setting(on_setting)
Best Practices
Naming Conventions
- Use descriptive names: “Temperature Threshold” instead of “Temp”
- Setting IDs are auto-generated:
id_temperature_threshold - Group related settings using categories
Categories
Organize your settings using the built-in categories:
| Category | Use For |
|---|---|
| General | Basic device configuration |
| Operation | Operating modes and behaviors |
| Position | Position/level settings (blinds, dimmers) |
| Timer | Time-related settings (delays, durations) |
| Sensors | Sensor thresholds and calibration |
| Display | Display/LED settings |
| Power | Power management settings |
| Network | Network configuration |
| Other | Miscellaneous settings |
Read-Only Settings
Use read-only settings for values that:
- Are set by the device (sensor readings, status indicators)
- Should be visible to users but not changeable
- Are computed or derived values
Validation Tips
- Number settings: Always set appropriate min/max ranges to prevent invalid values
- List settings: Provide clear, descriptive option names
- Precision: Use precision = 0 for integers, precision > 0 for decimals
Troubleshooting
Setting Not Updating
- Ensure the callback is registered in
setupSinricPro() - Verify the setting ID matches exactly (case-sensitive)
- Check that
return true;is included in the callback
Setting Not Appearing
- Confirm the setting is assigned to the device
- Check that the setting is not marked as read-only (for write operations)
- Refresh the device page
Code Generation Empty
- Ensure at least one non-read-only setting is assigned
- Read-only settings are excluded from generated code
Summary
The Settings feature provides a flexible way to manage device configuration:
- Create global settings with appropriate types and constraints
- Assign settings to your devices
- Generate callback code for your firmware
- Implement the callback to handle setting changes
This approach separates configuration from code, making your IoT devices more maintainable and user-friendly.