

Switch Tutorial Part 2 - How to use a push button to toggle the Relay
In this section, we will continue from Part 1 and add a push button to turn on and off the relay. We will also update the new status of the relay on the Sinric Pro server.
Prerequisites :
| Component | Quantity |
|---|---|
| ESP32, ESP8266 or RaspPi W | 1 |
| SPDT Relay controller | 1 |
| Push button | 1 |
| 10K ohm resistor | 1 |
| Jumper Wires | 1 |
Quick introduction to Push button & debouncing
Push buttons can often generate false signals when pressed. This is because the mechanical switch that makes up the button can bounce or chatter slightly when it is pressed. This can cause the button to send multiple signals to the MCU, even though it was only pressed once. The process of eliminating the these signals generated is called debouncing. To eliminate the noise of the push button, we can record a state change and then ignore further input for a few milliseconds.
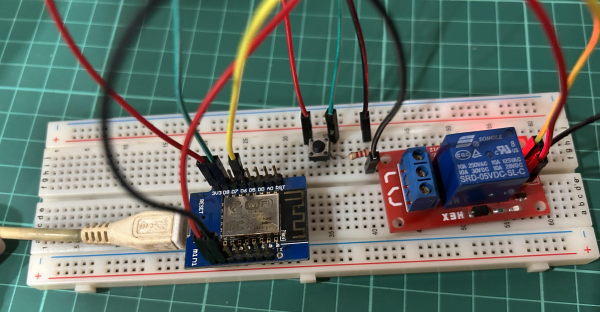
Wiring
There are two ways you can wire a push button.
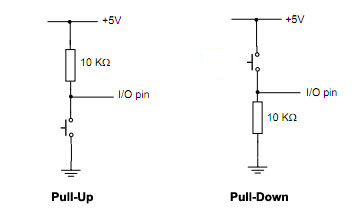
Pull-Up - When the switch is pressed, digitalRead reads LOW (0) signal.
Pull-Down - When the switch is pressed, digitalRead reads HIGH (1) signal.
| MCU | Pin | Component |
|---|---|---|
| ESP32 | 16 | Relay |
| ESP32 | 17 | Button |
| ESP8266 | 12 (D6) | Relay |
| ESP8266 | 15 (D8) | Button |
| RaspPi W | 6 | Relay |
| RaspPi W | 7 | Button |
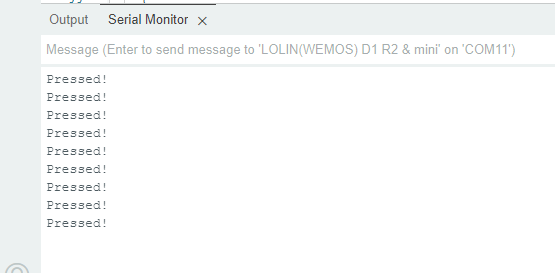
Before we integrate with sketch from part 1, it is important to verify that the button is wired correctly and working. You can use the following code to check whether the button press.
We are going to use Pull-Down method to wire our push button.
Now let’s complete sketch with push button, Relay controller with Sinric Pro integration.
Continue to Part 3 of this article series to learn how to control multiple push buttons with multiple relays.
Troubleshooting
Please refer to our Troubleshooting page for possible solutions to your issue.
This document is open source. See a typo? Please create an issue